Table of Content:
1. Introduction
1.1. Terminology
ETL is an abbreviation for extract,transform,load — three database functions combined into one tool to pull data out of one database, transform it and place into another.
- Extract is the process of reading data from a database. In this stage, the data is collected, often from multiple
and different types of sources. - Transform is the process of converting the extracted data from its previous form into the form needed to place it into another database.
- Load is the process of writing the data into the target database.
A job is a chain of individual stages linked together. It describes the flow of data from its source to target. Usually, a job has a minimum of one data input and output.
However, some jobs can accept more than one data input and output it to more than one target.
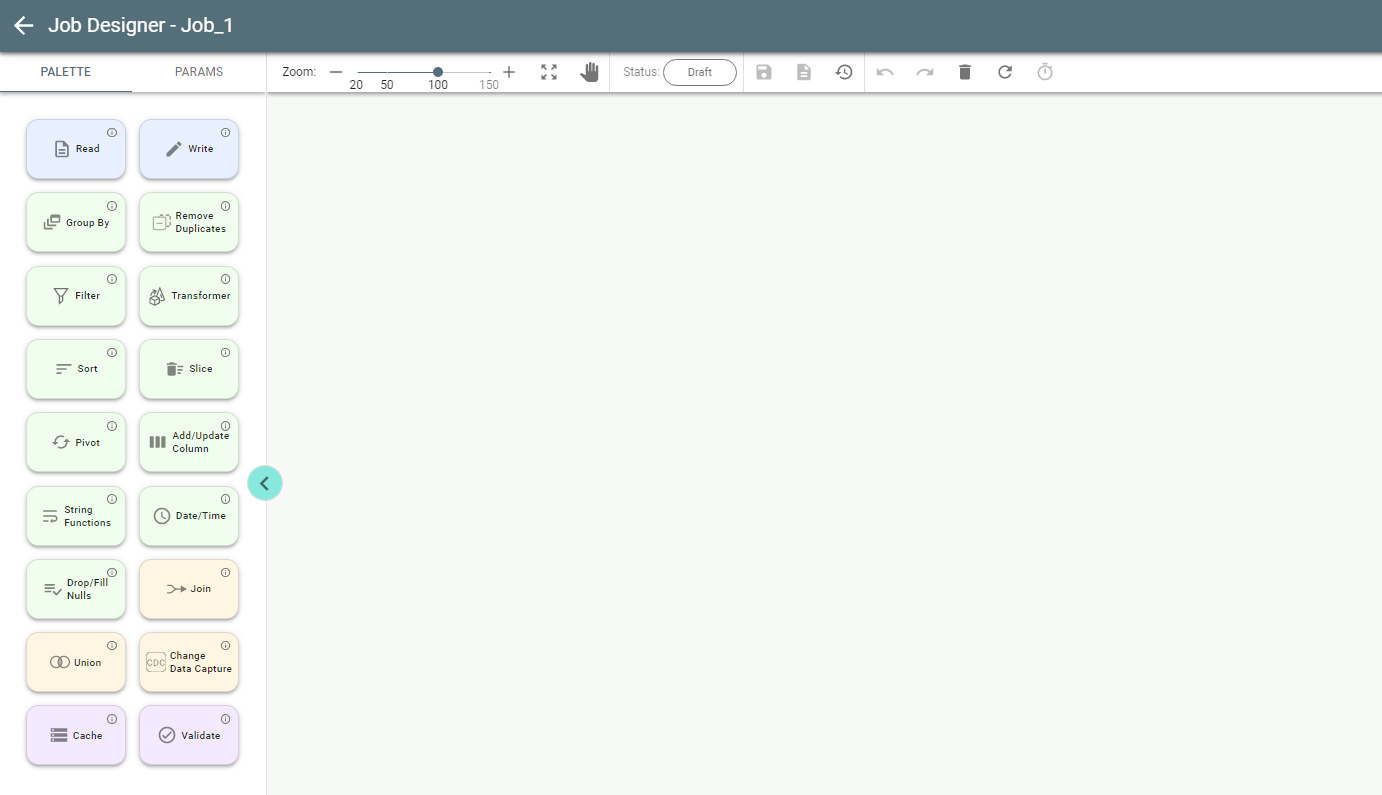
In Visual Flow, the available stages are:
- Read
- Write
- Group By
- Remove duplicates
- Filter
- Transformer
- Sort
- Slice
- Pivot
- Add/Update Column
- String Functions
- Date/Time
- Drop/Fill Nulls
- Join
- Union
- Change Data Capture
- Cache
A pipeline is a compound of multiple jobs and can be run. In Visual Flow, the user can use such stages as:
- Job
- Container
- Notification
- Wait
1.2. Scope and Purpose
The Visual Flow web application is the ETL tool designed for effective data manipulation via a convenient and user-friendly interface. The tool has the following capabilities:
- Can integrate data from heterogeneous sources:
✔ AWS S3
✔ Cassandra
✔ Click House
✔ DB2
✔ Elasticsearch
✔ IBM COS
✔ Local File
✔ Mongo
✔ MSSQL
✔ MySQL
✔ Oracle
✔ PostgreSQL
✔ Redis
✔ Redshift
✔ Redshift-jdbc - Perform data processing and transformation
- Leverage metadata for analysis and maintenance
1.3. Process Overview
Visual Flow jobs and pipelines exist within a certain namespace (project), so the first step in the application would be to create a project or enter an existing one. Then you need to enter Job Designer to create a job.
Job Designer is a graphical user interface used to create, maintain, execute and analyze jobs.
Each job determines the data sources, the required transformations and the destination of data.
Pipeline designer is a graphical user interface aimed at managing pipelines. Designing a pipeline is similar to doing so on a job.
Important: When editing stages in the Configuration Panel, to save data a user must click the Confirm button, otherwise the data will be lost.
Visual Flow key functions include but not limited to:
✔ Create a project which serves as a namespace for jobs and/or pipelines
✔ Manage project settings
✔ User access management
✔ Create/maintain a job in Job Designer
✔ Job execution and logs analysis
✔ Create/maintain a pipeline in Pipeline Designer
✔ Pipeline execution
✔ Import/Export jobs and pipelines
2. Roles and authorizations
The following roles are available in the application:
✔ Viewer
✔ Operator
✔ Editor
✔ Administrator
They enable one to perform the below operations within the namespaces they contain access to. Only a Super-admin user can create a workspace (project) and grant access to this project.
| Role | Actions | ||
| Project Settings | Jobs | Pipelines | |
| Viewer | View All | View All | View All |
| Operator | View All | View All / execute jobs | View All / execute pipelines |
| Editor | Edit All but Users/Roles | Edit / execute jobs | Edit / execute pipelines |
| Admin | Edit All | Edit / execute jobs | Edit / execute pipelines |
3. Project Operations.
3.1. Getting started
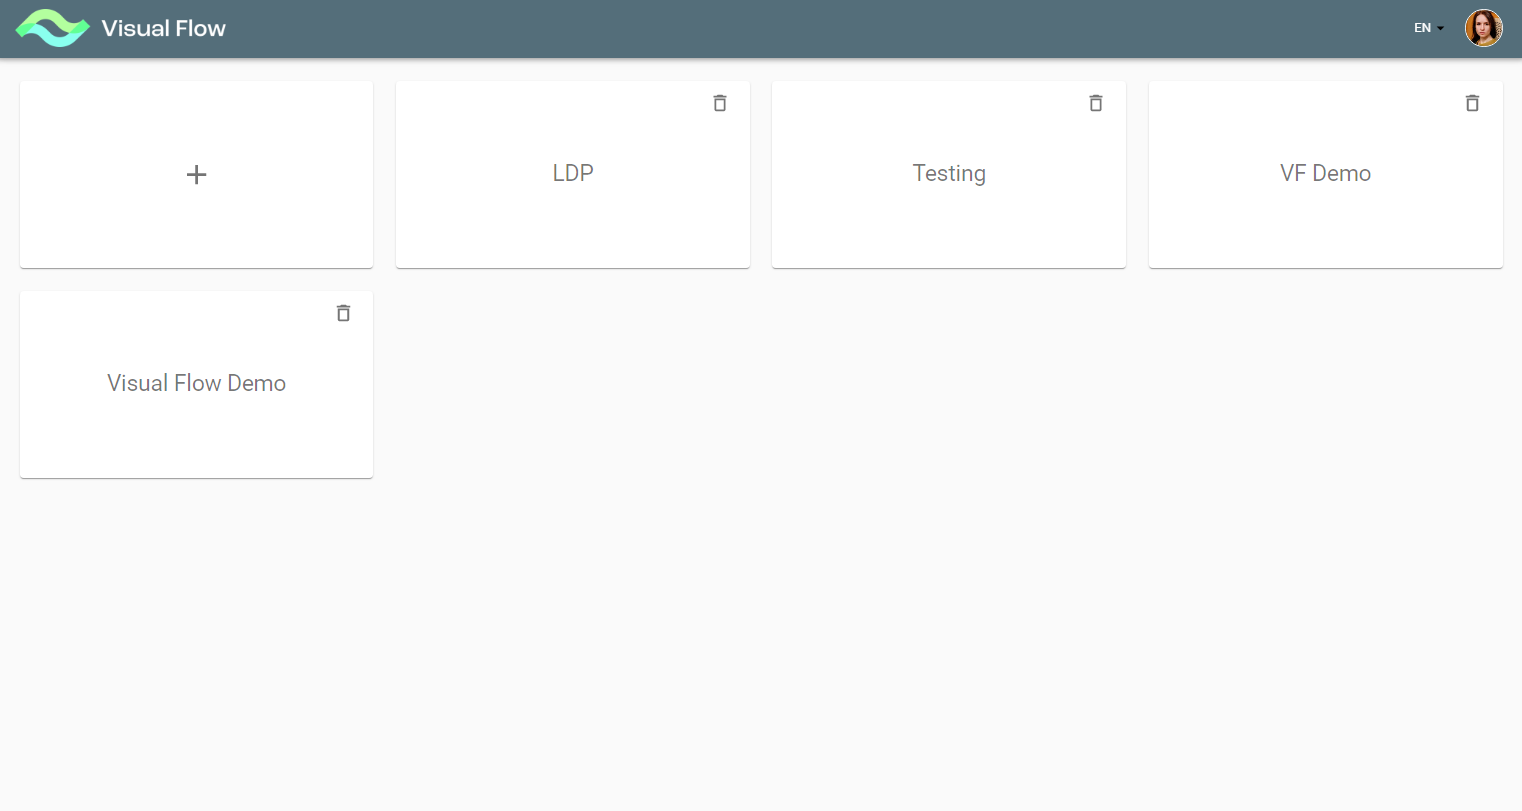
Once you first log on to the application, you see the initial screen with all existing projects:
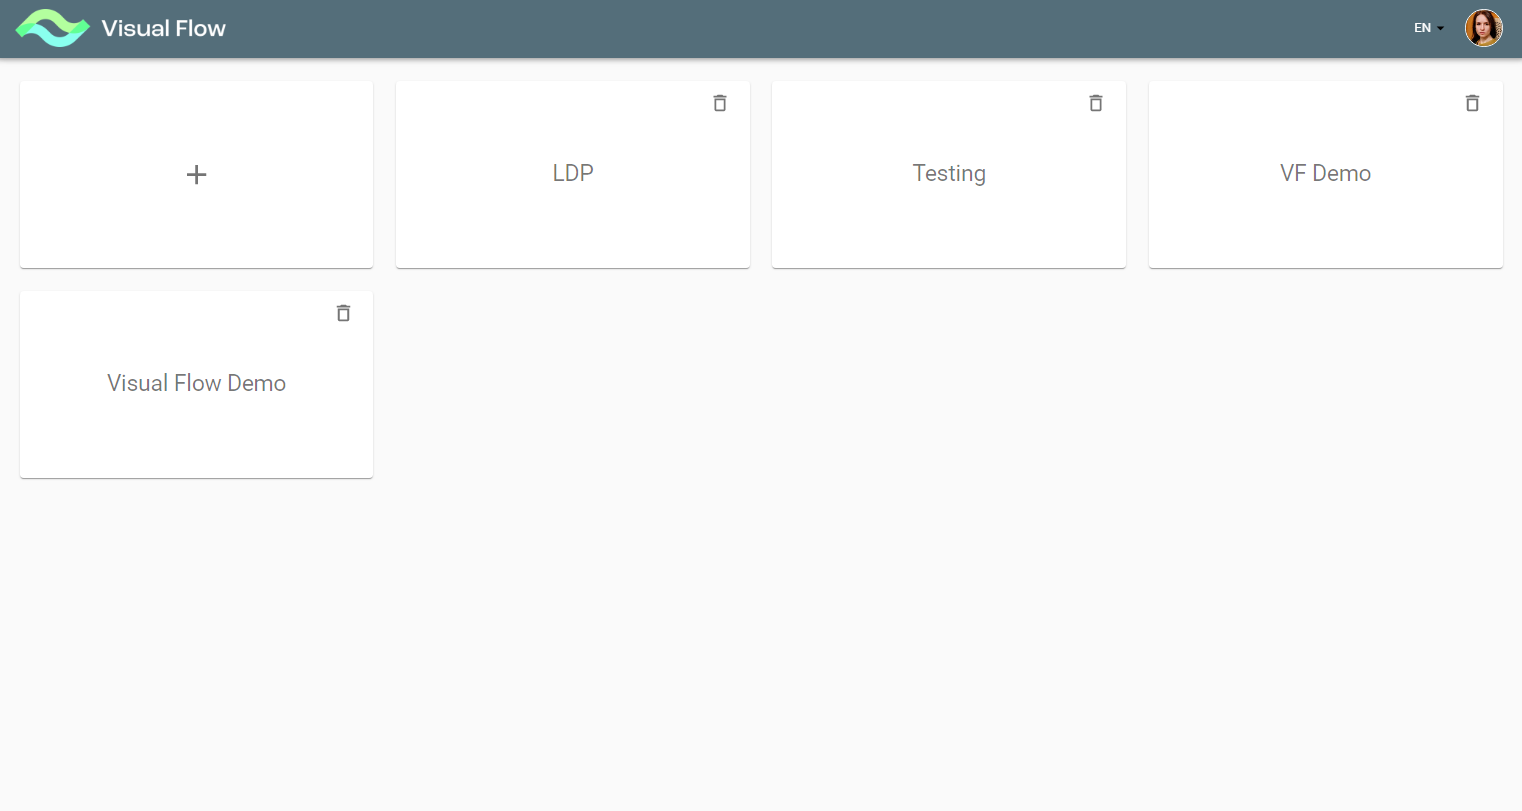
If you are not authorized for a particular project, it is locked for you, so you see the lock icon on its tile. Please contact project owners to get access to their projects.
If you click on the user icon in the top right corner, you get to user profile menu:
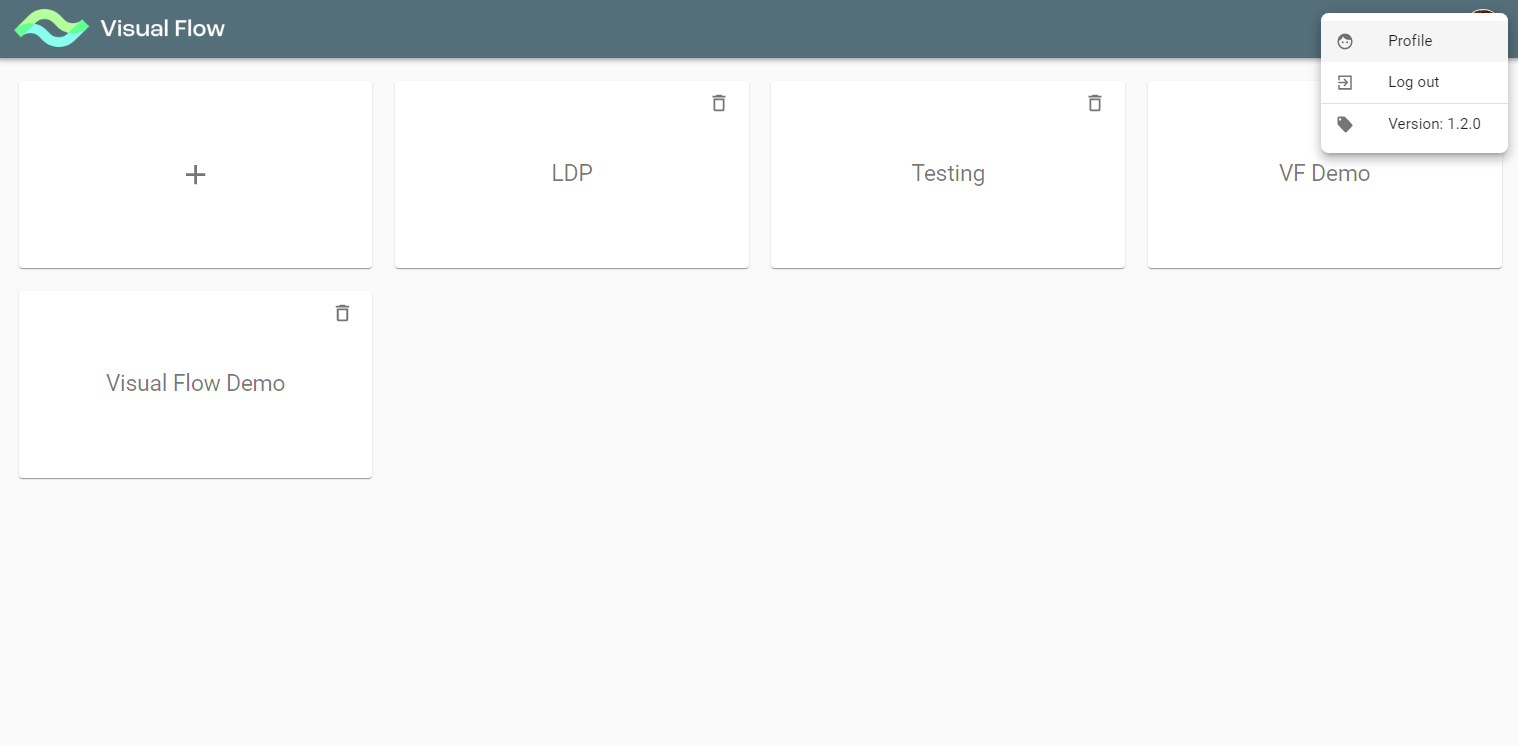
Here you can view your user profile or log out. Also it displays the application current version number.
3.2. Create a Project
To create a project, you need to push the “+” button.
Note: this is the action of the Super-admin user only. The button is not visible for the application roles (Viewer, Operator, Editor, Admin).
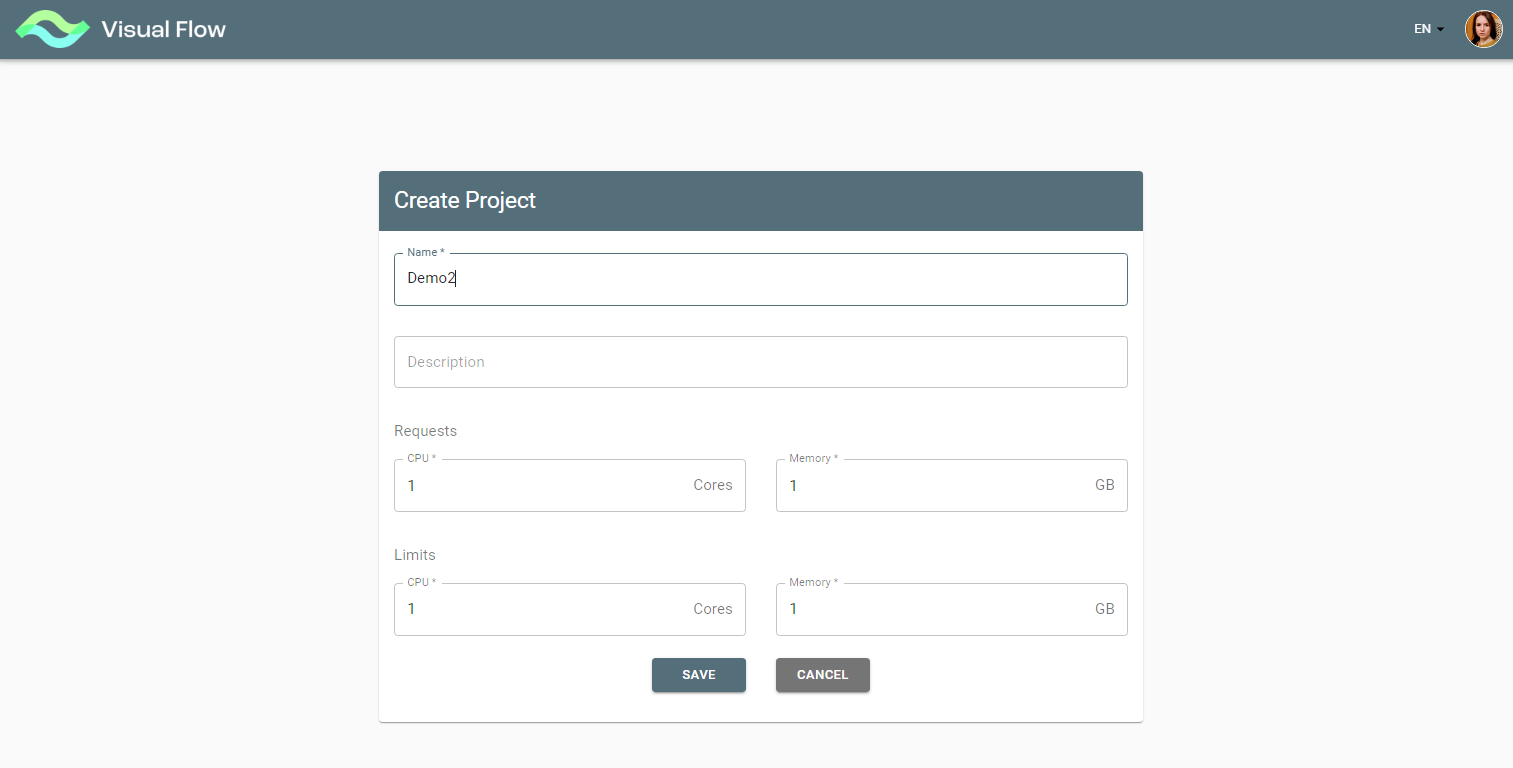
With the “+” button pushed, you get to Create Project Form to enter basic project settings:
- Project Name
- Project Description
- Requests (CPU/Memory)
- Limits (CPU/Memory)
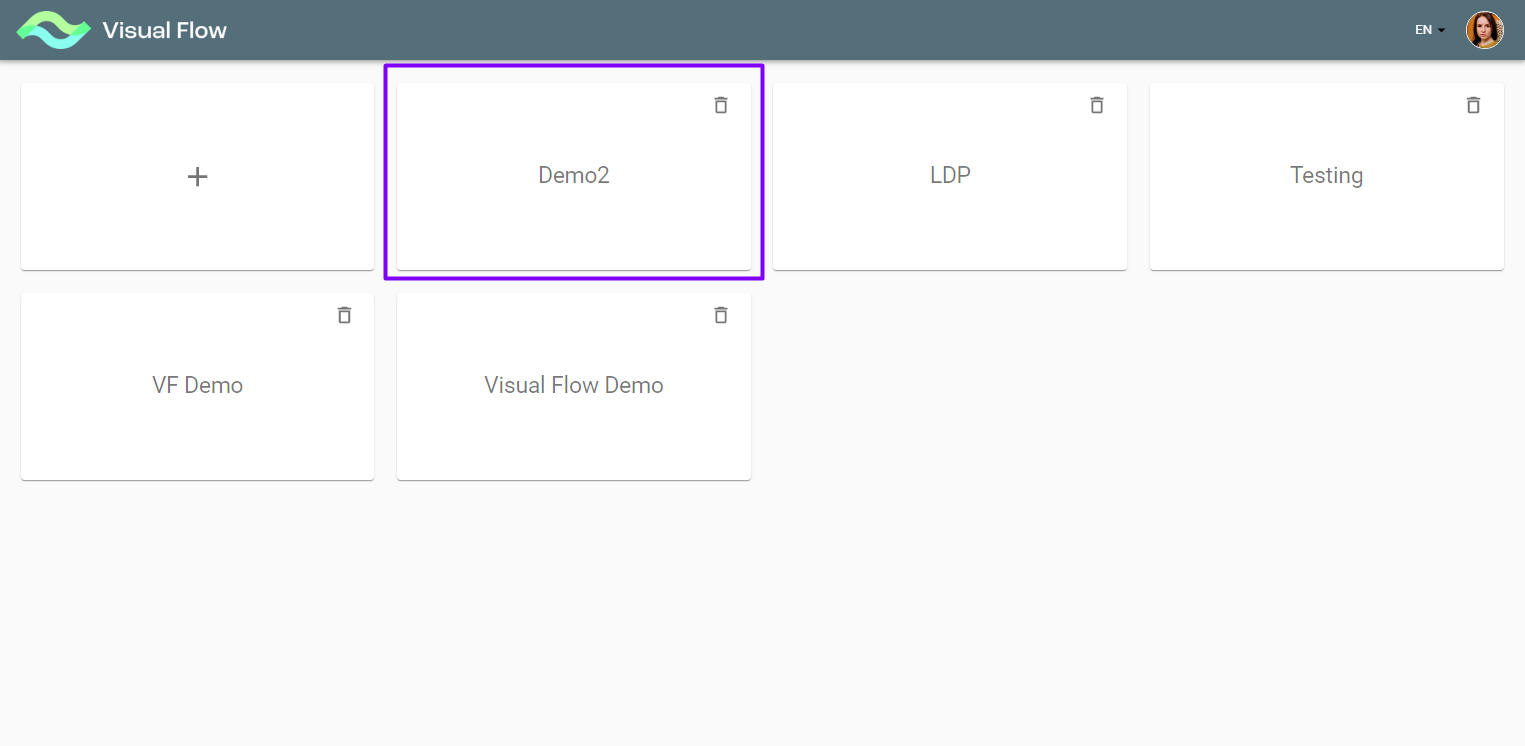
After saving Create Project Form the project is created under the given name and then can be found on the initial screen:
3.3. Project Overview
The screen contains the project left menu and displays information about the project jobs, pipelines and resource utilization (applicable for running jobs).

3.4. Manage Project Settings
The Settings submenu contains:
- Basic
- Parameters
- Connections
- Users/Roles
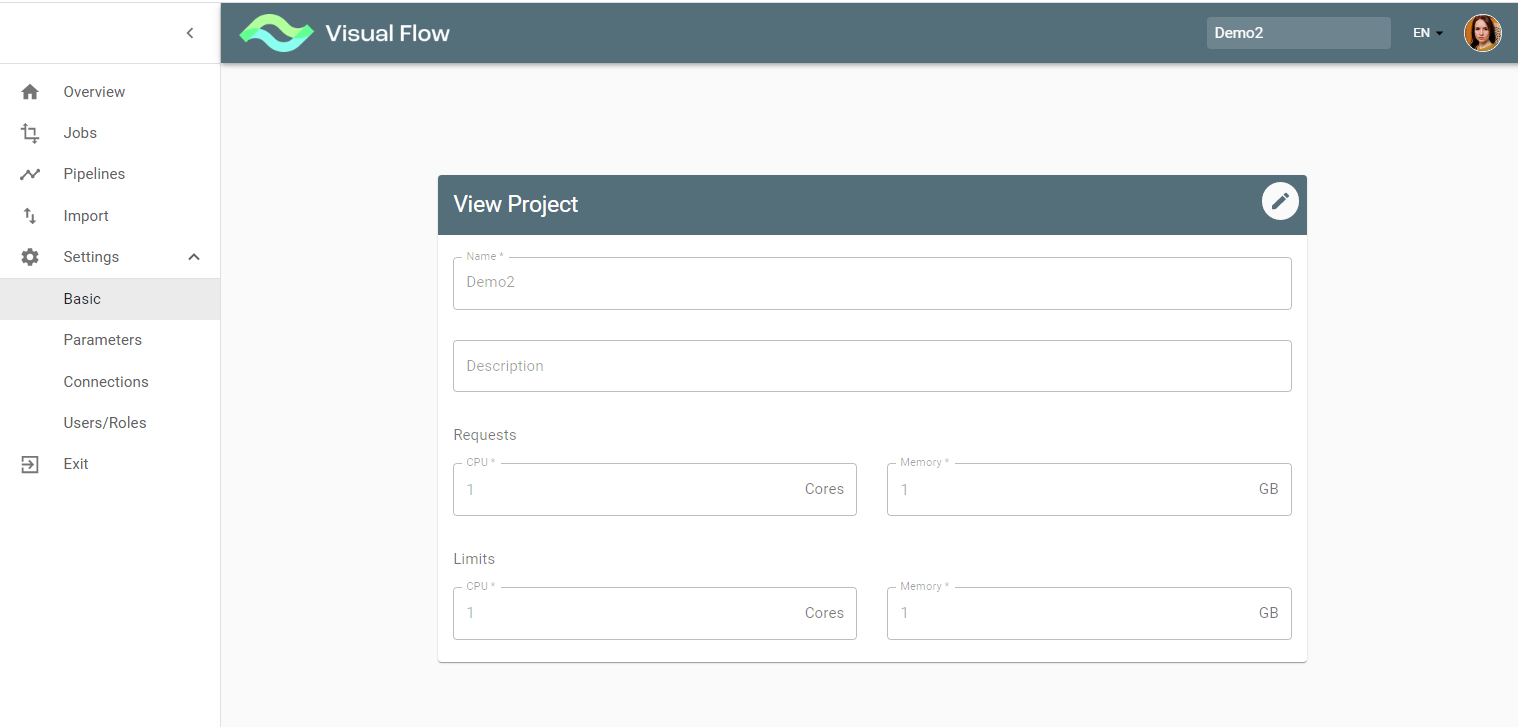
1) The Basic is already there after project creation. The Edit button turns on the edit mode for updates.
2) The Parameters stores values required for the entire project, e.g., JDBC connection, DB2 credentials, or table schema can be the same for multiple jobs within a project and therefore stored at the project level.
The Create Parameter button opens dialog on the right so you can introduce a new parameter.
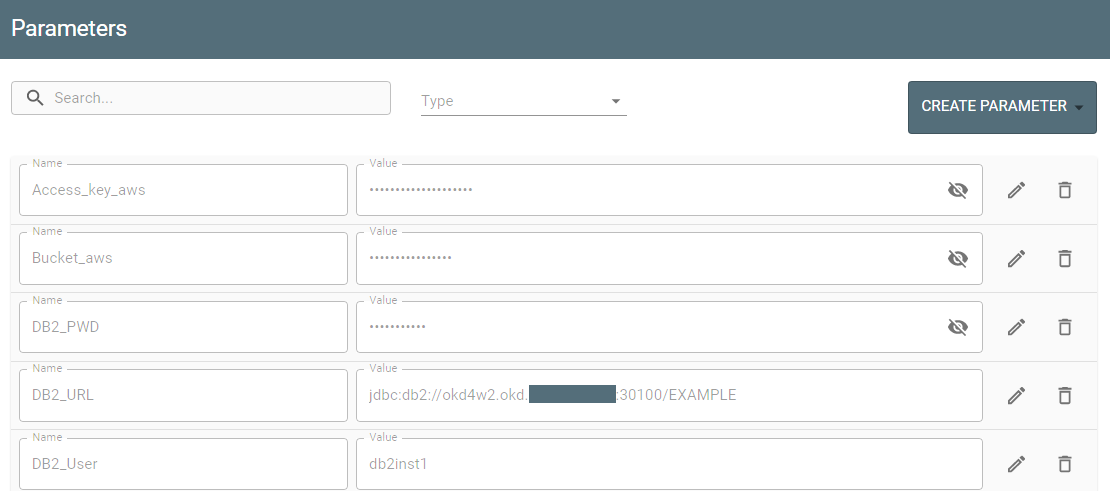
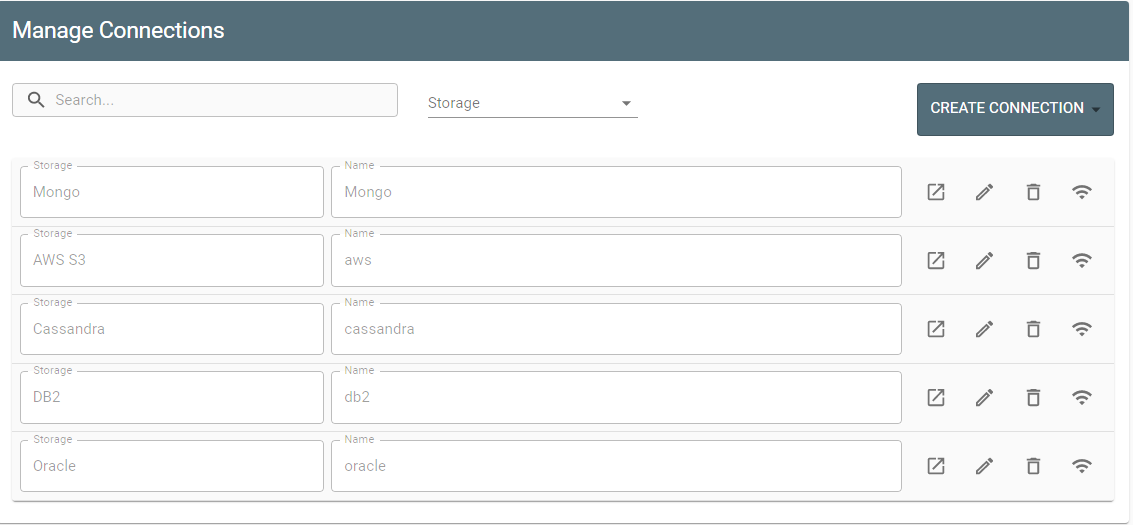
3) The Connections option enables the user to manage connections to a storage.
Here you see a list of all existing connections with their name/storage type and available actions (view, edit, delete, ping). Also, you can create a new connection with the Create Connection button.
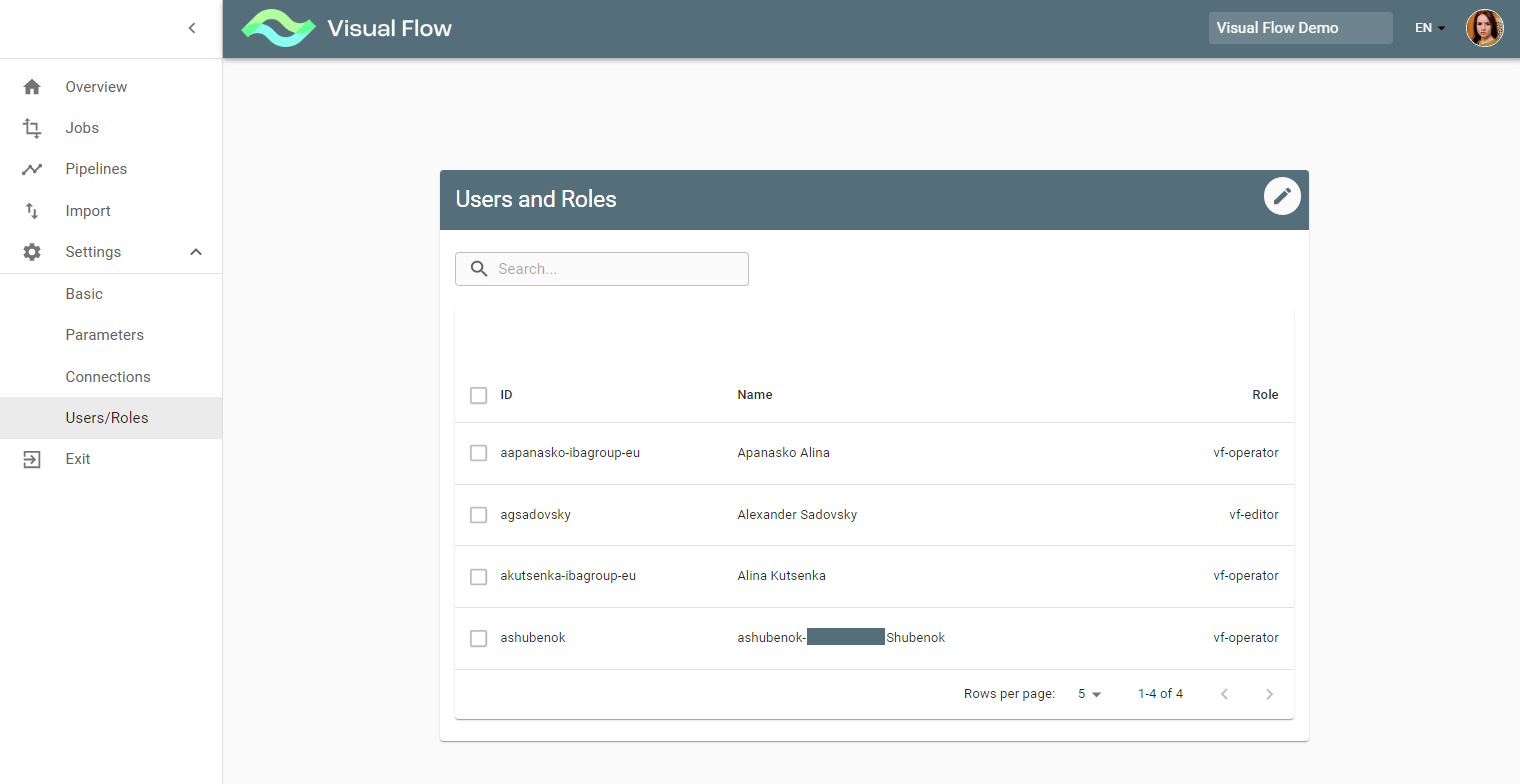
4) The Users/Roles is meant for user access management or to view user access depending on your
authorization. Users cannot set roles to themselves. This operation can be performed by Admin or Super-admin only. So if you try to change your role, you will get the error message: “You cannot change your role”.
The Edit button and therefore Edit mode is only available for an Admin within the project or for a Super-admin.
4. Job operations
4.1. Jobs Overview
Clicking the Jobs menu item leads to the Jobs overview screen, which allows you to see a list of jobs existing within a project. If a job is used in a pipeline, it is indicated by ![]() (pipeline) icon.
(pipeline) icon.
The Jobs overview screen displays the following information:
- Job Name
- Job Last run/Last finished/Last edit
- Job Status
- Resource Utilization (CPU/Memory)
- Available Actions (Run/Job Designer/Logs/Copy/Job History/ Delete)
A job has a certain status at various phases of execution:
- Draft
- Pending
- Running
- Succeeded
- Failed
- Unknown (This status appears very rarely in case of undefined error)
Notes:
- The actions availability and, therefore, visibility depends on user authorizations
- One cannot delete a job that compounds a pipeline

4.2. Create a Job. Available Stages.
With the Add Job button pushed you get to Job Designer to create a new job.
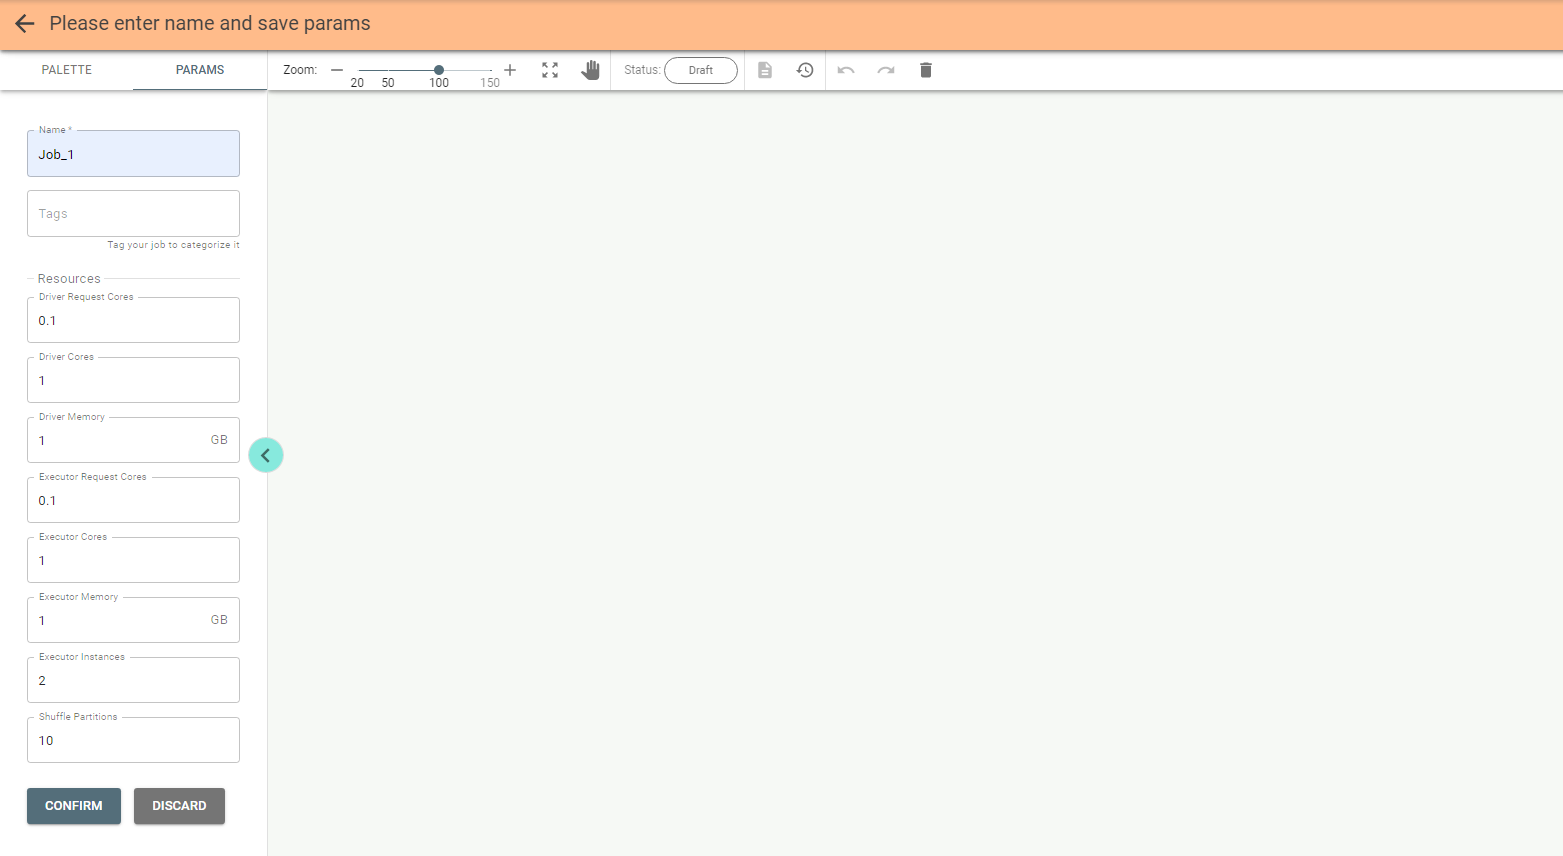
You must provide a name for the job on the left configuration panel.
Tags can be used to classify your job.
Update parameters or keep their default values and then push the Confirm button:
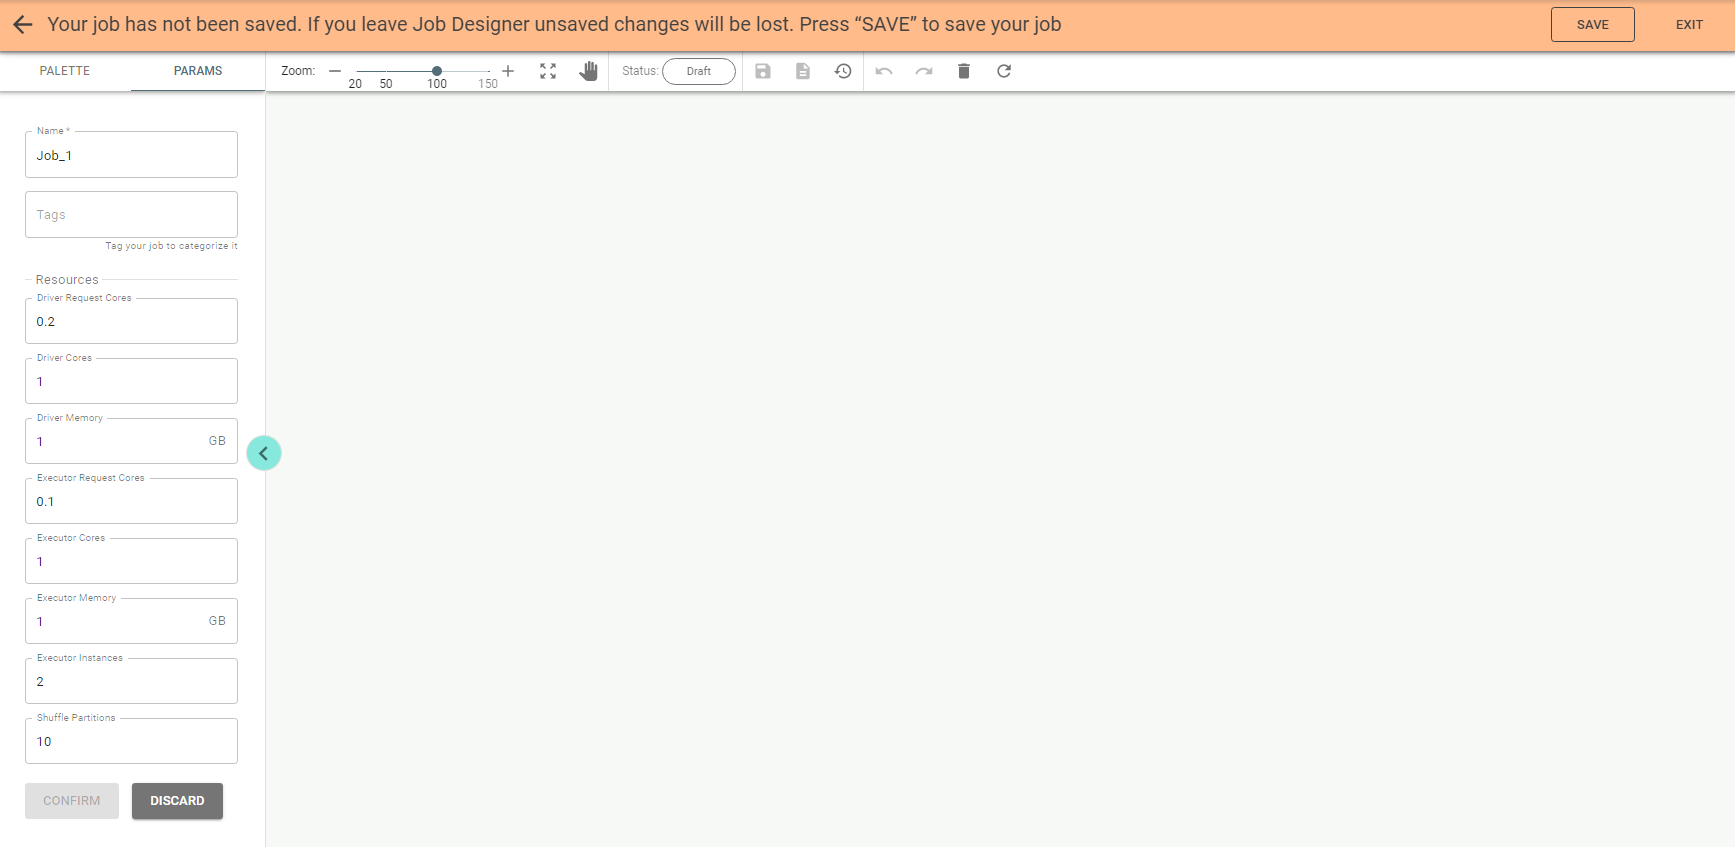
Save the job by pushing the Save button on Job Designer header.
Now you see the Palette tab with all available stages:
4.2.1. Read Stage.
You can start creating a job by dragging a stage to the canvas, e.g., you can drag the Read stage:
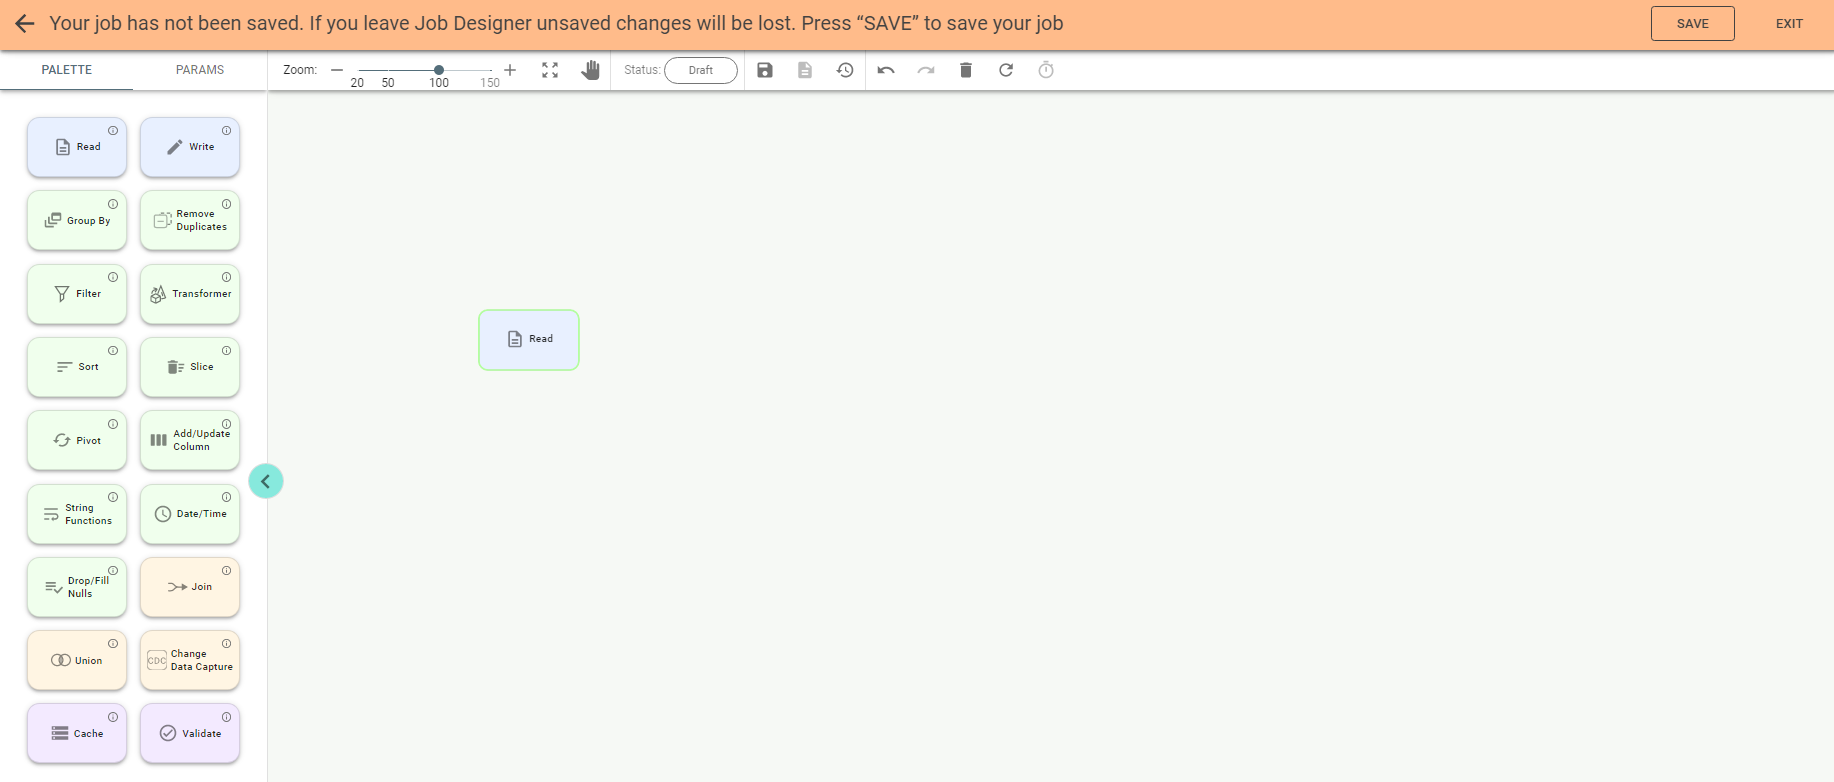
Note: you can also add a stage by double clicking its tile on the palette.
Double-click on a stage on canvas opens the configuration panel on the right:
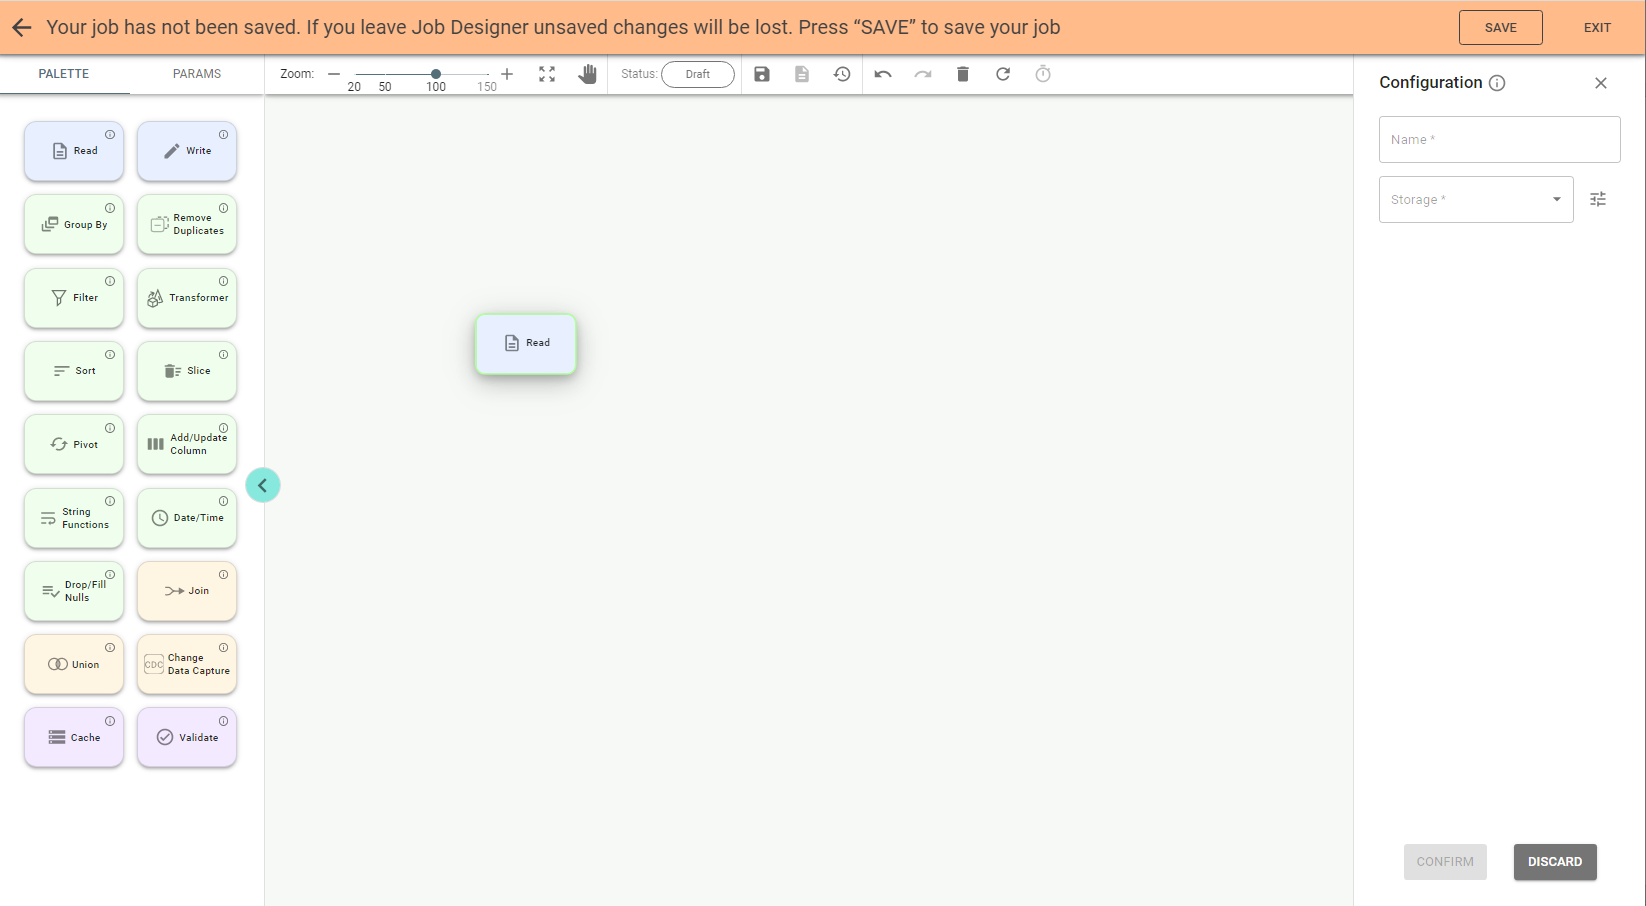
Enter a name for the stage and select storage e.g. DB2 if you want to read data from the DB2 table.
Available Storage values for Read stage are:
✔ AWS S3
✔ Cassandra
✔ Click House
✔ Dataframe
✔ DB2
✔ Elasticsearch
✔ IBM COS
✔ Mongo
✔ MySQL
✔ MSSQL
✔ Oracle
✔ PostgreSQL
✔ Redis
✔ Redshift
✔ Redshift-JDBC
Important: you can select an existing connection with the Parameters button near the Storage field:
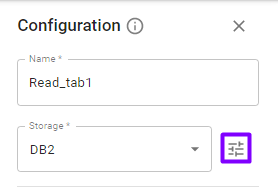
If you do so, its parameters, e.g., JDBC URL, user, etc., are filled automatically.
But now, suppose you don’t have a connection created previously, so fill required parameters for DB2 storage manually:

Important: you can pick up a parameter value with the Parameters ![]() button on the right panel if it is previously created as a project parameter.
button on the right panel if it is previously created as a project parameter.
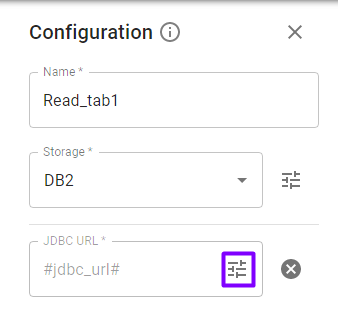
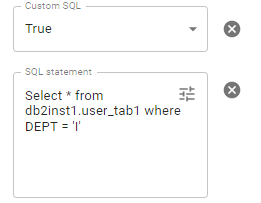
The Read stage for DB2 storage has an option Custom SQL to read data with SQL statement (e.g., select * from table where field = value). If you select Custom SQL – True you need to enter the SQL statement and specify the schema:
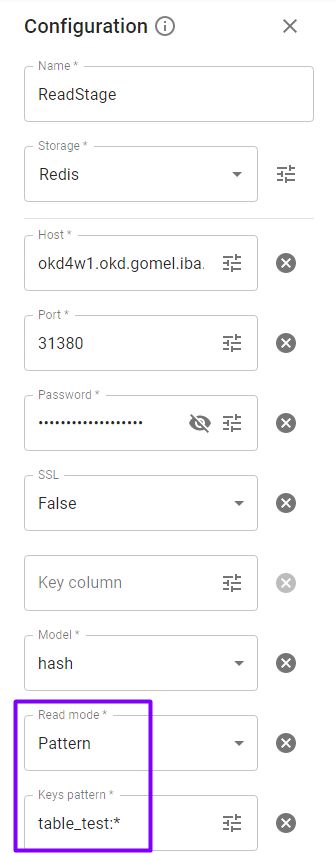
For the Redis source you need to define Key column, Model, SSL, Read mode, Keys pattern or Table fields in the Configuration of the Read stage.
✔ Key column. The Column name to store the hash key.
✔ Model (binary, hash) defines the Redis model used to persist dataframe. By default, it is hash.
✔ Read mode (key, pattern) defines how the read operation is handled. If Key is selected, then the read
is done based on the table field. In the case of Pattern the provided pattern (option Keys Pattern) dictates
what Redis key to read.
Keys pattern. If the pattern ends with * (e.g., “table: *”), all keys from it are read.
If one pattern is defined (e.g., “table: first value”), then only one key is read.
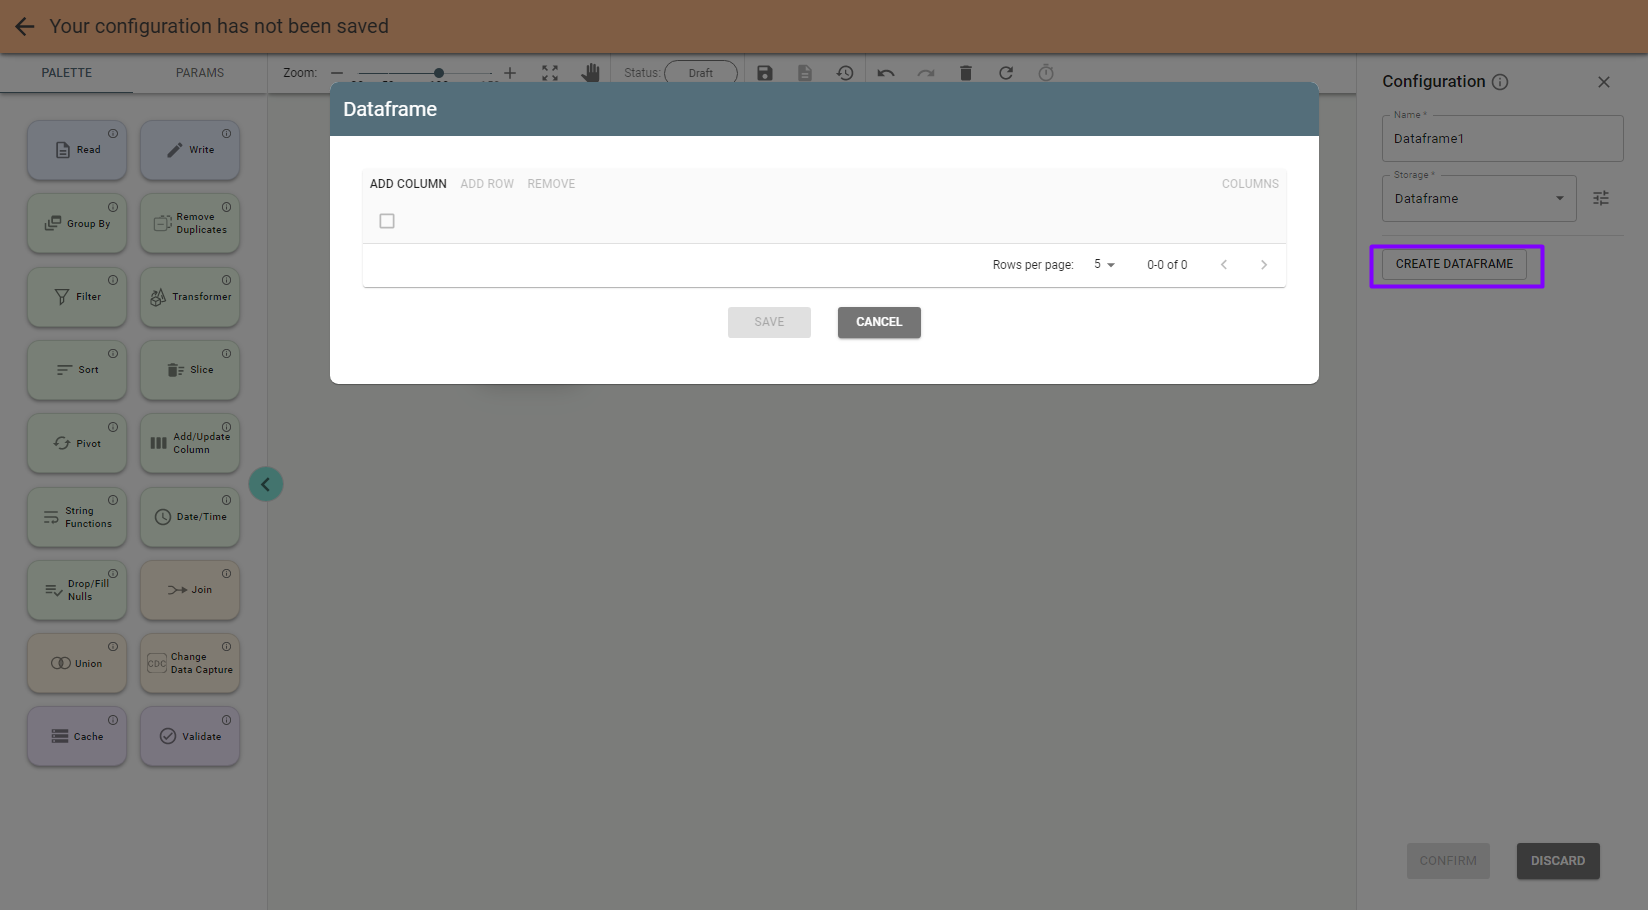
Note: with Dataframe storage option you can create your own dataset:
Save the stage by pushing the Confirm button on the configuration panel. Push the Save button above if you want to save the job at this step.
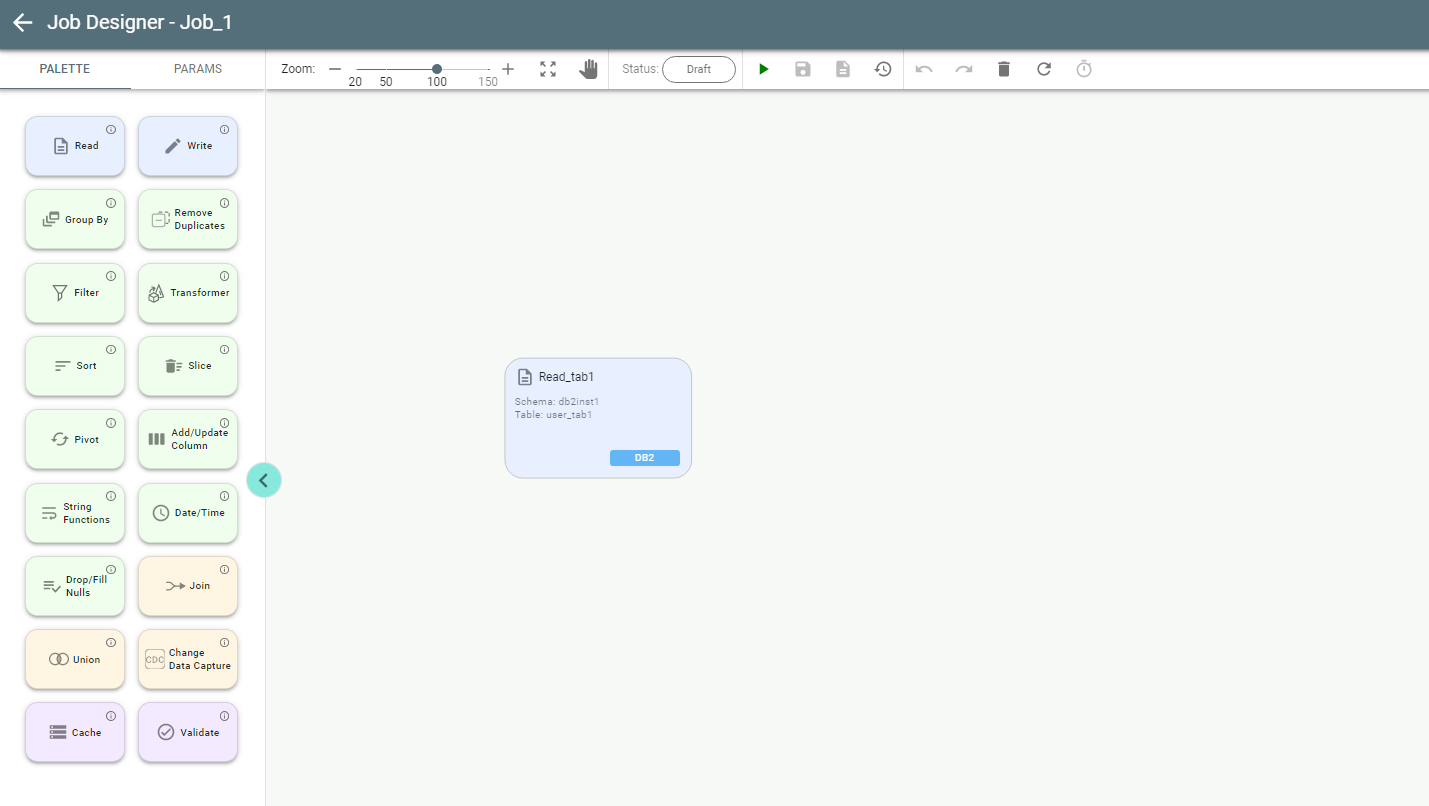
When the first stage of the job is configured, the canvas looks like this:
4.2.2. Write Stage.
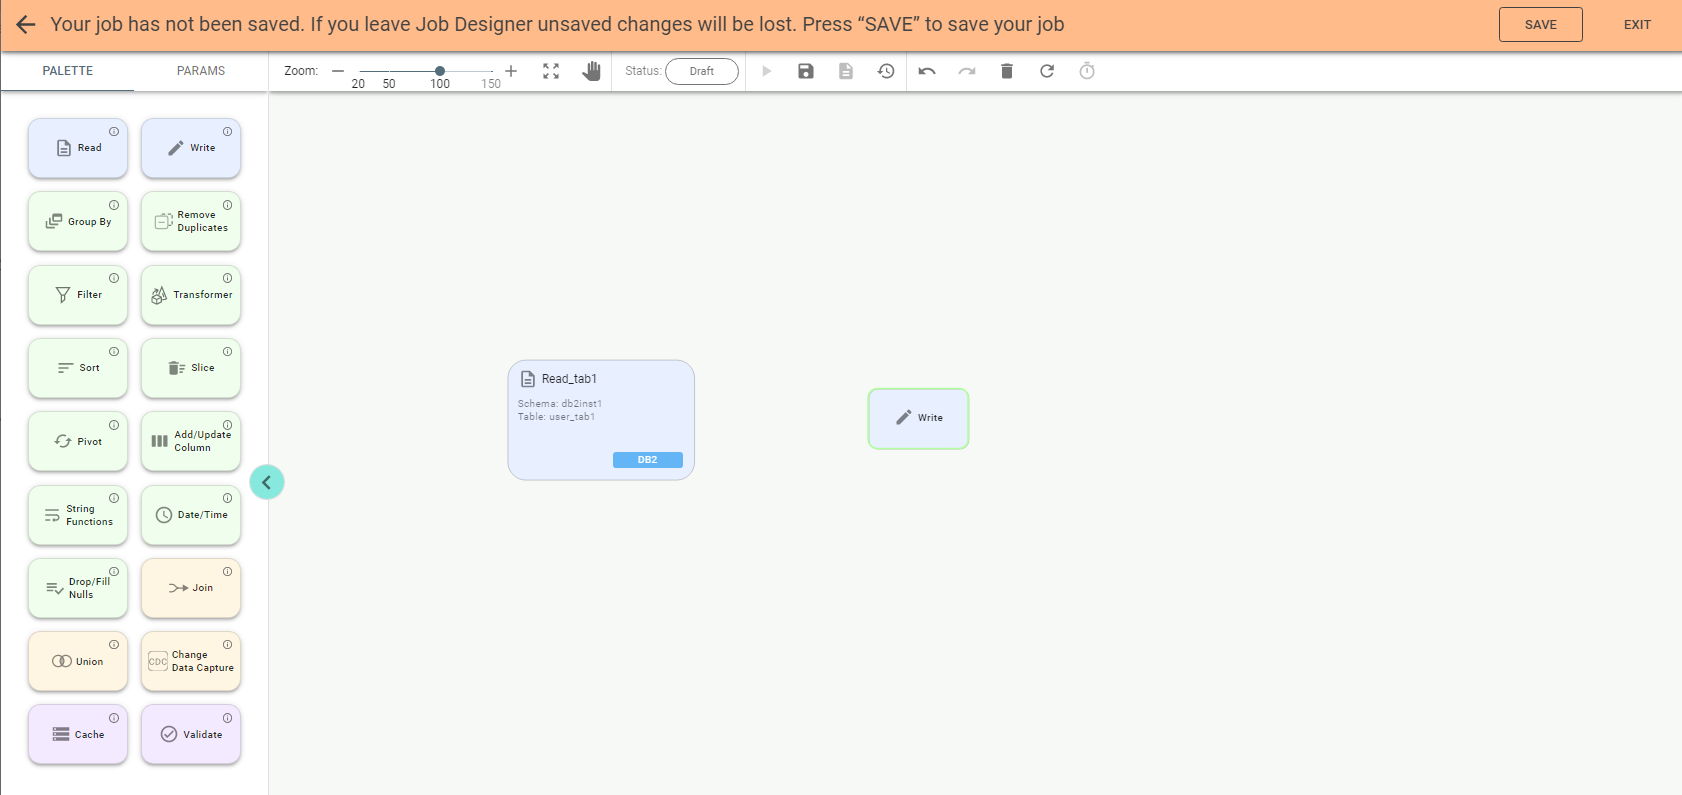
Now drag another stage, e.g., Write stage:
Enter a name for the stage and select storage IBM COS if you want to post data from the DB2 table to the Cloud Object Storage file. Fill required parameters for the IBM COS storage.
Available storage values for the Write stage are:
✔ AWS S3
✔ Cassandra
✔ Click House
✔ DB2
✔ Elasticsearch
✔ IBM COS
✔ Local file
✔ Mongo
✔ MSSQL
✔ MySQL
✔ Oracle
✔ PostgreSQL
✔ Redis
✔ Redshift
✔ Redshift-jdbc
✔ STDOUT
IBM COS storage has two options of Authentication type: HMAC and IAM.
If HMAC is selected, you should fill accessKey and secretKey.
If IAM is selected, iamApiKey and iamServiceId should be entered.
For the storages IBM COS and AWS S3 the function Partition By can be used in the Write stage. It partitions the output on the file system by given columns. If specified, the output is laid out on the file system similar to Hive’s partitioning scheme.
As an example, when we partition a dataset by year and then month, the directory layout looks like this:
– year=2016/month=01/
– year=2016/month=02/
In the case of importing table data with Write stage to Cassandra source from another storage, the table layout for output must be previously created in Cassandra. Columns, key fields, and data types of the fields must be specified in the table.
Important: All the above points must match the imported table.
If the column names have uppercase characters in the imported table when data is output to Cassandra, the job will fail as column names are stored there in lowercase only. You can resolve this issue with the Transformer stage.
The output recorded to STDOUT storage can be seen in Logs. The number of records shown in the logs can be specified in the Quantity field. The available range is from 1 to 2147483631 records.
For Redis source in Write stage, the following fields must be specified: Key column, Model, SSL, TTL, Table and Write mode.
✔ Key column. For writing. It specifies the unique column used as the Redis key. By default, the key is auto-generated.

✔ TTL. Data expiration time in seconds. Data doesn’t expire if TTL is negative or 0. By default, it is 0. A positive value of TTL means the number of seconds in which the data will be removed.
Important:
The Write mode field defines how data is posted to its destination. Available values are:
✔ Overwrite
✔ Append
✔ Error if Exists
With Overwrite Write mode Truncate mode can be used for DB2, Oracle, MySQL, PostgreSQL, MSSQL and Redshift:
- None. No truncation occurs, but the target table is deleted and recreated. Note that all the indexes, constraints and other modifiers assigned for this table will be lost.
- Simple. The standard truncation that deletes data from the target table but keeps the indexes, constraints and other modifiers intact. However, if the target table has a primary key referenced as a foreign key in other tables, the truncation will fail. To resolve this, either use Cascade mode or manually drop constraints (outside of VF) prior to accessing the table with VF.
- Cascade (only for Oracle and PostgreSQL). The cascade truncation not only deletes the data from the target table but also from other tables that use the target table’s primary key as a foreign key constraint.
File format is to choose a format of the destination file. Available formats are:
✔ CSV
✔ JSON
✔ Parquet
✔ ORC
✔ Text
✔ Avro
Confirm the stage by pushing Confirm on the panel. Now there are two stages to connect.

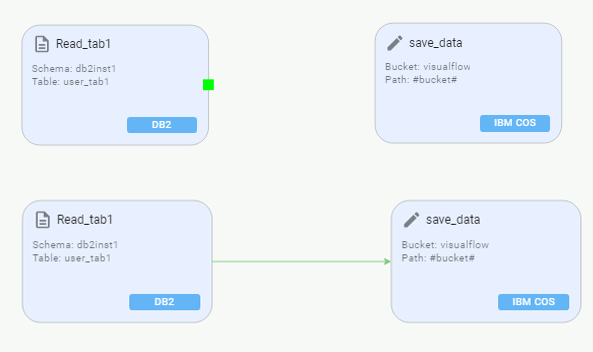
Important: to connect stages, hover a mouse on a stage edge until you see a green rectangle. Click and drag it to the border of another stage and its green rectangle. When you reach it, a green arrow should appear.
Other stages available are:
✔ Group By
✔ Remove Duplicates
✔ Filter
✔ Transformer
✔ Sort
✔ Slice
✔ Pivot
✔ Add/Update Column
✔ String Functions
✔ Date/Time
✔ Drop/Fill Nulls
✔ Join
✔ Union
✔ Change Data Capture
✔ Cache
4.2.3. Group By Stage.
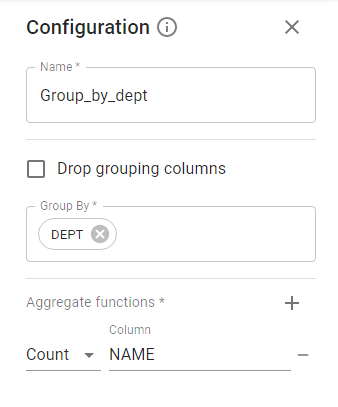
The stage allows grouping by columns, which must be specified in the Configuration panel. There is an option Drop grouping columns for removing them from the output. Also you can use the aggregate function, e.g., Count, Avg, etc.
4.2.4. Remove Duplicates Stage.
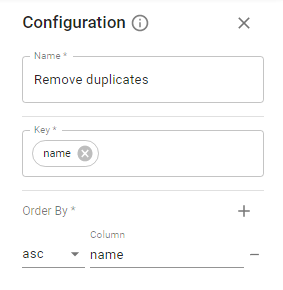
Specify a key column for the operation. To specify more than one key, use a comma or Enter. For Order By operation, you need to select columns to sort by and sort order. The default is ascending.
4.2.5. Filter Stage.
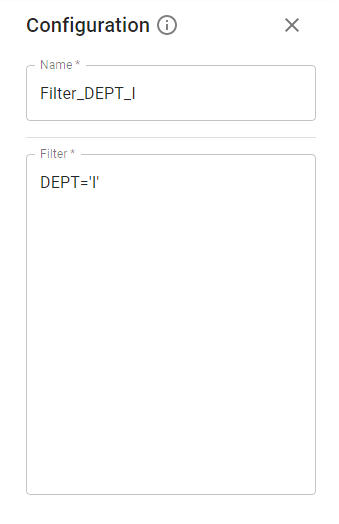
Enter any boolean expression. You can combine two or more ones by using logical operators (AND, OR).
Examples: (column1 < 10) and (column2 between 10 and 25).
4.2.6. Transformer Stage.
The Transformer stage allows you to modify columns to fill them with data further. Transformer mode defines the type of SQL query (Spark SQL dialect) which is taken to execute.
Simple mode only allows you to specify the part between SELECT and FROM. You can do things like these:
- col1, concat(col1, col2)
- count(*) as count
- a, b, row_number() OVER (PARTITION BY a ORDER BY b)
- col, exists(col, x -> x % 2 == 0)
- col, collect_list(col)
The syntax is: <column_name_1> as <alias_1>, function(<column_name_2>) as <alias_2>.
Full SQL mode allows you to write a full-blown Spark SQL query. In this case, you have to specify a table name
manually or reference a table name from a parameter.
Table name. The name of the table which should be used within the Spark SQL query. Applicable for Full SQL transformer mode only.
4.2.7. Sort Stage.
There are two types of sorting available: Full sort and Sort within partitions.
Full sort classifies dataframe by the specified column(s).
Sort within partitions sorts each dataframe partition by the specified column(s). In this case, the order of the output data is not guaranteed because the data is ordered at the partition level.
Select column(s) to sort by and the sort order (default value is Asc).
Available sort options:
- asc
- asc nulls first
- asc nulls last
- desc
- desc nulls first
- desc nulls last
4.2.8. Slice Stage.
The Slice stage allows you to remove unnecessary columns from your data stream. There are 2 modes of Slice stage:
- Keep
- Drop
The default mode is Drop. In this case, you specify columns you would like to slice from your data flow.
With Keep mode selected, you specify the columns you want to keep.
4.2.9. Pivot Stage.
The Pivot stage has two operation types:
- Pivot
- Unpivot
Pivot function rotates data from one column into multiple columns (transpose a row to a column).
With aggregation one of the grouping column values is transposed into individual columns with distinct data.
| Product | Amount | Country |
| Banana | 1000 | USA |
| Carrots | 1500 | USA |
| Beans | 1600 | USA |
| Orange | 2000 | USA |
| Orange | 2000 | USA |
| Banana | 400 | China |
| Carrots | 1200 | China |
| Beans | 1500 | China |
| Orange | 4000 | China |
| Banana | 2000 | Canada |
| Carrots | 2000 | Canada |
| Beans | 2000 | Mexico |
From the above dataframe, to get the total amount exported to each country of each product we group by Product, pivot by Country and sum the Amount. This transposes the countries from the dataframe rows into columns and produces the below output. Missing data is represented as Null.
| Product | Canada | China | Mexico | USA |
| Orange | Null | 4000 | Null | 4000 |
| Beans | Null | 1500 | 2000 | 1600 |
| Banana | 2000 | 400 | Null | 1000 |
| Carrots | 2000 | 1200 | Null | 1500 |
Unpivot is a reverse operation used to transform it back by rotating column values into rows values.
For Pivot operation you need to specify:
- Group By. Columns for grouping
- Pivot columns
- Aggregate function and column
- Pivot values. Values from pivot column to be used (optional)
For Unpivot operation you need to specify:
- Unchanged columns
- Unpivot columns. Columns for unpivoting
- Unpivot names. Column names for unpivoting
4.2.10. Add/Update Column Stage.
The Add/Update Column stage is used to add a new column to a dataframe, change value of an existing column, convert the data type of a column or derive a new column from an existing column. Also it gives the ability to use conditions or window functions to provide column values.
It has the following operations types:
- deriveColumn
- addConstant
- changeType
- renameColumn
- useConditions
- useWindowFunctions
If you select useWindowFunctions you need to pick a function from the dropdown list. Each one has its own parameters to enter.
The available window functions are:
- rank
- dense_rank
- percent_rank
- cume_dist
- row_number
- ntile
- lag
- lead
- count
- sum
- avg
- max
- min
4.2.11. String Functions Stage.
The String Functions stage is handy when we need to make string operations on a dataframe column.
The Operation type dropdown list contains the following Spark built-in standard string functions:
- ascii
- base64
- concat_ws
- decode
- encode
- format_number
- format_string
- title_case
- instr
- length
- lower
- locate
- lpad
- ltrim
- regexp_extract
- ubase64
- rpad
- repeat
- rtrim
- split
- substring
- substring_index
- trim
- upper
4.2.12. Date/Time Stage.
Date/Time stage leverages Spark standard built-in date and timestamp functions which come in handy when we need to make operations on date and time. All these operations accept input of type: date, timestamp or string. If string, it should be in a format that can be cast to date, such as yyyy-MM-dd and timestamp in yyyy-MM-dd HH:mm:ss.SSSS. It returns date and timestamp respectively. Null is returned if the input data was a string that could not be cast to date or timestamp.
4.2.13. Drop/Fill Nulls Stage.
Drop/Fill Null stage allows gracious null handling.
There are 2 modes:
- Drop
- Fill
With Drop mode you can:
1) Remove all columns where all the rows have null values. For that you need to set Drop Type to Column and Drop Choice to All.
2) Remove specific columns where all the rows have null values. For that you need to set Drop Type to Column, Drop Choice to Names and specify column names you want to drop.
3) Remove all rows where all the values are null. For that you need to set Drop Type – Row and Drop Choice – All.
4) Remove all rows, where all the values are null in specific columns. (Works as a filter). For that you need to set Drop Type to Row, Drop Choice to Names and specify drop column names.
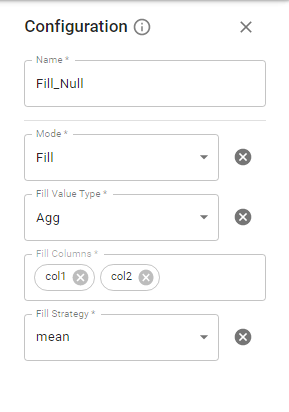
Fill mode is used to replace NULL values on a dataframe column with any constant value or using aggregate function. (Fill Value Type – Custom or Agg respectively ).
Fill Value Type – Custom allows you to replace all columns with one value at once or specify a specific value per column you want to fill with. For that you need to select Fill Choice – All or Names respectively.
Fill Value Type – Agg allows you to fill a specific column with a Strategy, which stands for the aggregation types: “mean“, “median” or “mode“.
4.2.14. Join Stage.
Available types of join are:
- Inner Transfers records from input data sets whose key columns contain equal values to
the output data set. Records whose key columns do not contain equal values are dropped. - Left outer Transfers all values from the left data set but transfers them from the right one only when key columns match. The stage drops the key column from the right data set.
- Right outer Transfers all values from the right and left data sets. Intermediate them only when key columns match. The stage drops the key column from the left and intermediate data sets.
- Full outer Transfers records in which the contents of the key columns are equal from the left and
right input data sets to the output. It also transfers records whose key columns contain unequal values from input and output data sets. - Cross Returns a result data set where each row from the first table is combined with each from the second table.
- Left semi Returns values from the left relation that has a match with the right.
- Left anti Returns values from the left relation that has NO match with the right.
Link Ordering option allows you to specify which input link is regarded as the left and which as the right. By default, the first link added is left, and the last one is right.
4.2.15. Change Data Capture Stage.
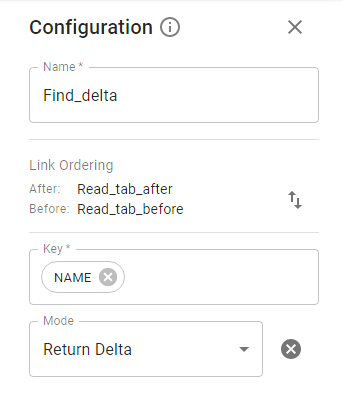
This stage is intended to find all differences between before (old) and after (new) datasets. Based on them, CDC produces an additional column — ‘Operation’, which indicates the state of the row from the old dataset considering its presence/absence in the new one. CDC compares each row of the new and the old datasets based on keys and columns to compare values and sets Operation value.
Note: old and new datasets must not contain duplicates (rows with the same key) based on key column(s). Old and new datasets columns to compare, as well as key columns, must be present in both datasets with the same name.
If there are duplicated rows in at least one dataset, the result of the CDC gets unpredictable.
4.2.16. Union Stage.
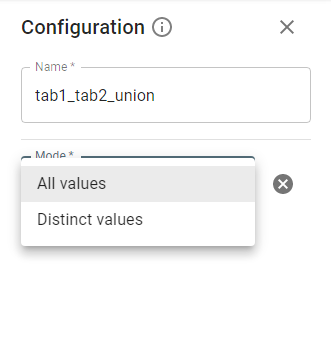
You can union two datasets.
Note: Columns sequence, names, and types are important for union operation.
Mode contains 2 options: All values and Distinct values.
- Distinct values, which is the default, eliminates duplicate records from the second dataset.
- All values needs to be specified explicitly, and it tolerates duplicates from the second dataset.
4.2.17. Cache Stage.
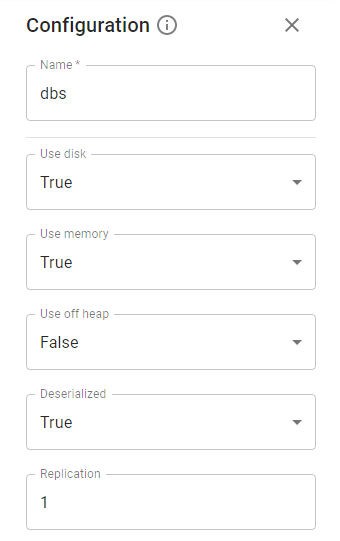
The Cache stage persists dataset in some storage. You can tweak the storage type by specifying parameters.
The configuration gives you the ability to define:
✔ Whether to use memory.
✔ Whether to drop the RDD to disk if it falls out of memory.
✔ Whether to keep the data in memory in a serialized format.
✔ Whether to replicate the RDD partitions on multiple nodes.
Save the job by pushing Save on Job Designer header.
For a newly created job, as long as it is not yet run, its status is Draft: ![]()
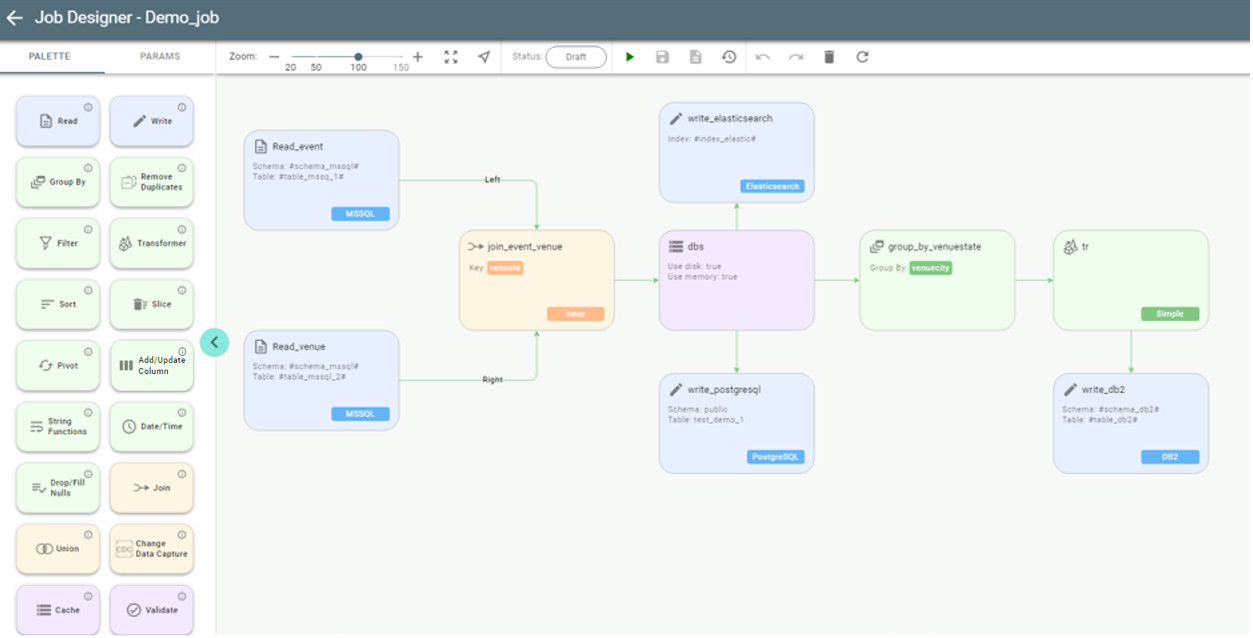
Drag other stages according to the data flow from source to destination.
See the job with more stages as an example:
4.3. Job Designer functions overview
The following functions are available in Job Designer:
✔ Zoom operations: ![]()
✔ Switch mode between
Move ![]() and Select
and Select ![]()
✔ Show job status ![]()
✔ Run job ![]() / Stop job
/ Stop job ![]() (for running)
(for running)
✔ Save job ![]()
✔ See job logs ![]()
✔ See job history ![]()
✔ Undo / Redo operation on canvas ![]()
✔ Remove element from canvas ![]()
✔ Refresh ![]()
Note: you can copy stages on canvas using the mouse right-click menu options:
✔ copy stage
✔ paste stage
4.4. Job Execution
Push the Play button ![]() to run the job:
to run the job:
Its status changes from Draft to Pending ![]()
Push Refresh to update the status. It should turn to Running ![]()
While running, it can be interrupted with the Stop button. ![]() When a job is completed, its status is Succeeded or Failed
When a job is completed, its status is Succeeded or Failed
Use the Logs button ![]() to analyze job logs. It gets you to Logs screen:
to analyze job logs. It gets you to Logs screen:
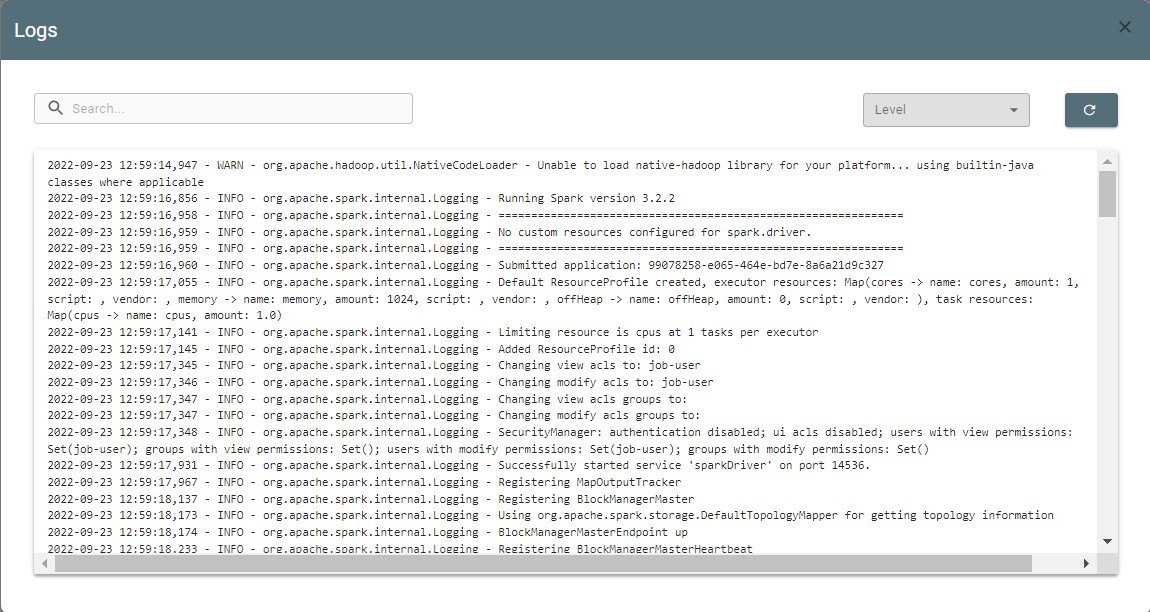
Logs can be filtered by level. Such as:
✔ INFO
✔ WARNING
✔ ERROR
✔ DEBUG
✔ RESULT
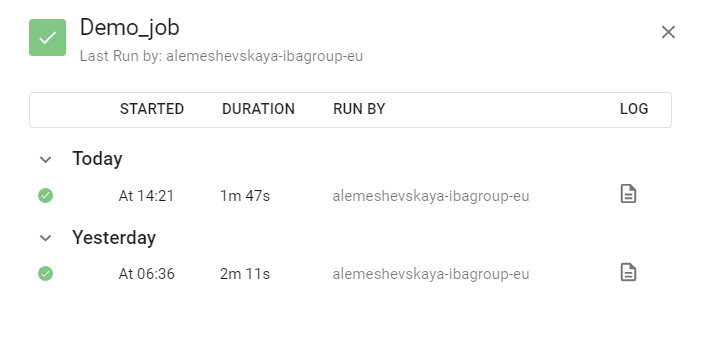
You can also view earlier job runs data with the Job History button:
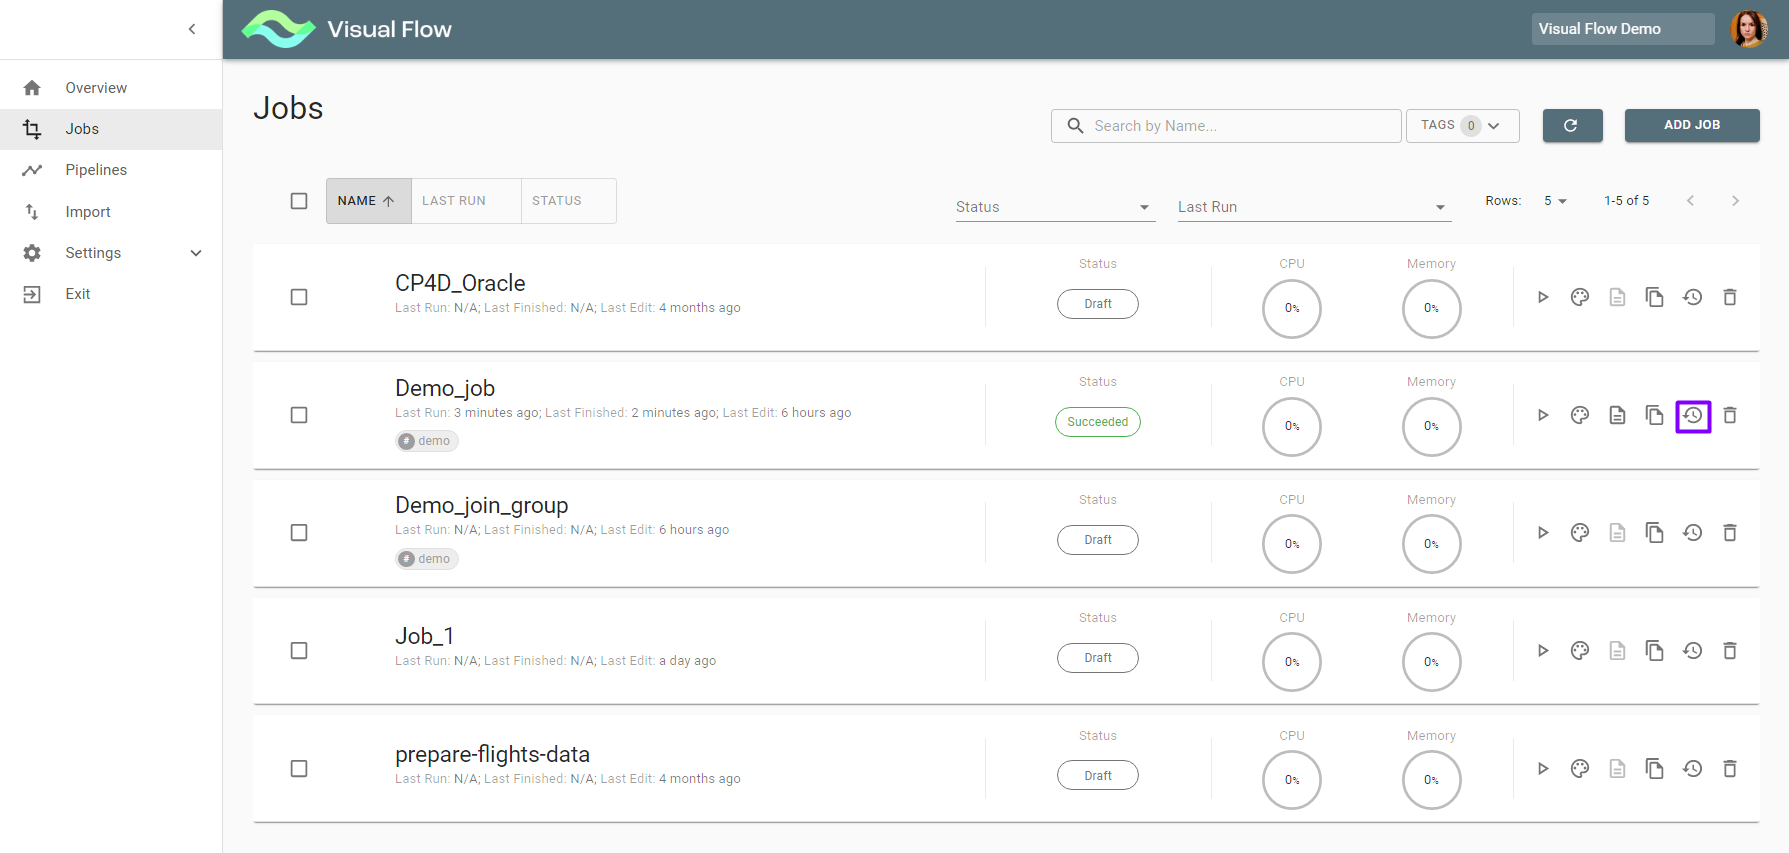
It takes you to Job History screen, containing each job run data, including logs:
5. Pipeline Operations
5.1. Pipelines Overview
Clicking the Pipelines menu item takes you to the Pipelines overview screen, which shows a list of pipelines existing within a project.
It displays the following information:
- Pipeline Name
- Checkbox for deleting/exporting multiple pipelines
- Pipeline Last run/Last finished/Last edit
- Pipeline Status
- Pipeline Progress
- Available Actions (Run/Pipeline Designer/ Scheduling /History/Copy/Delete)
Pipeline has a certain status at various phases of execution:
- Draft
- Error (This status may appear due to incorrectly entered data)
- Failed
- Pending
- Running
- Succeeded
- Suspended
- Terminated

Note: the actions availability and therefore visibility depends on user authorizations.
5.2. Create a Pipeline
With the Add Pipeline button pushed, you get to Pipeline Designer for creating a pipeline.
On the left configuration panel the Params tab is open by default, where you can enter a pipeline name and tags for the pipeline classification:
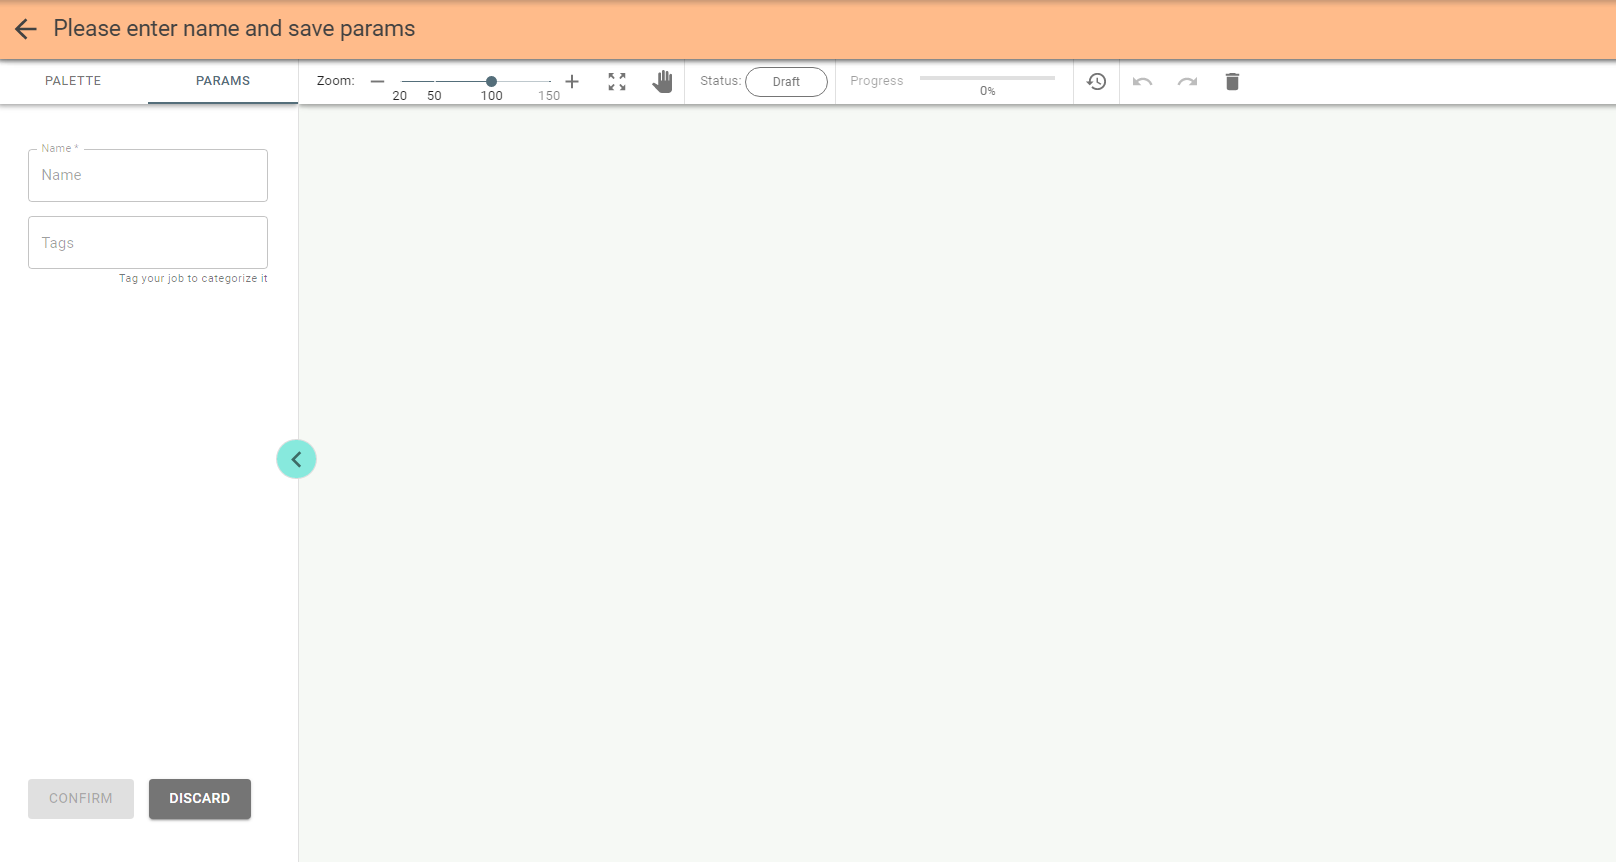
Once you add a name, notifications become available to you:
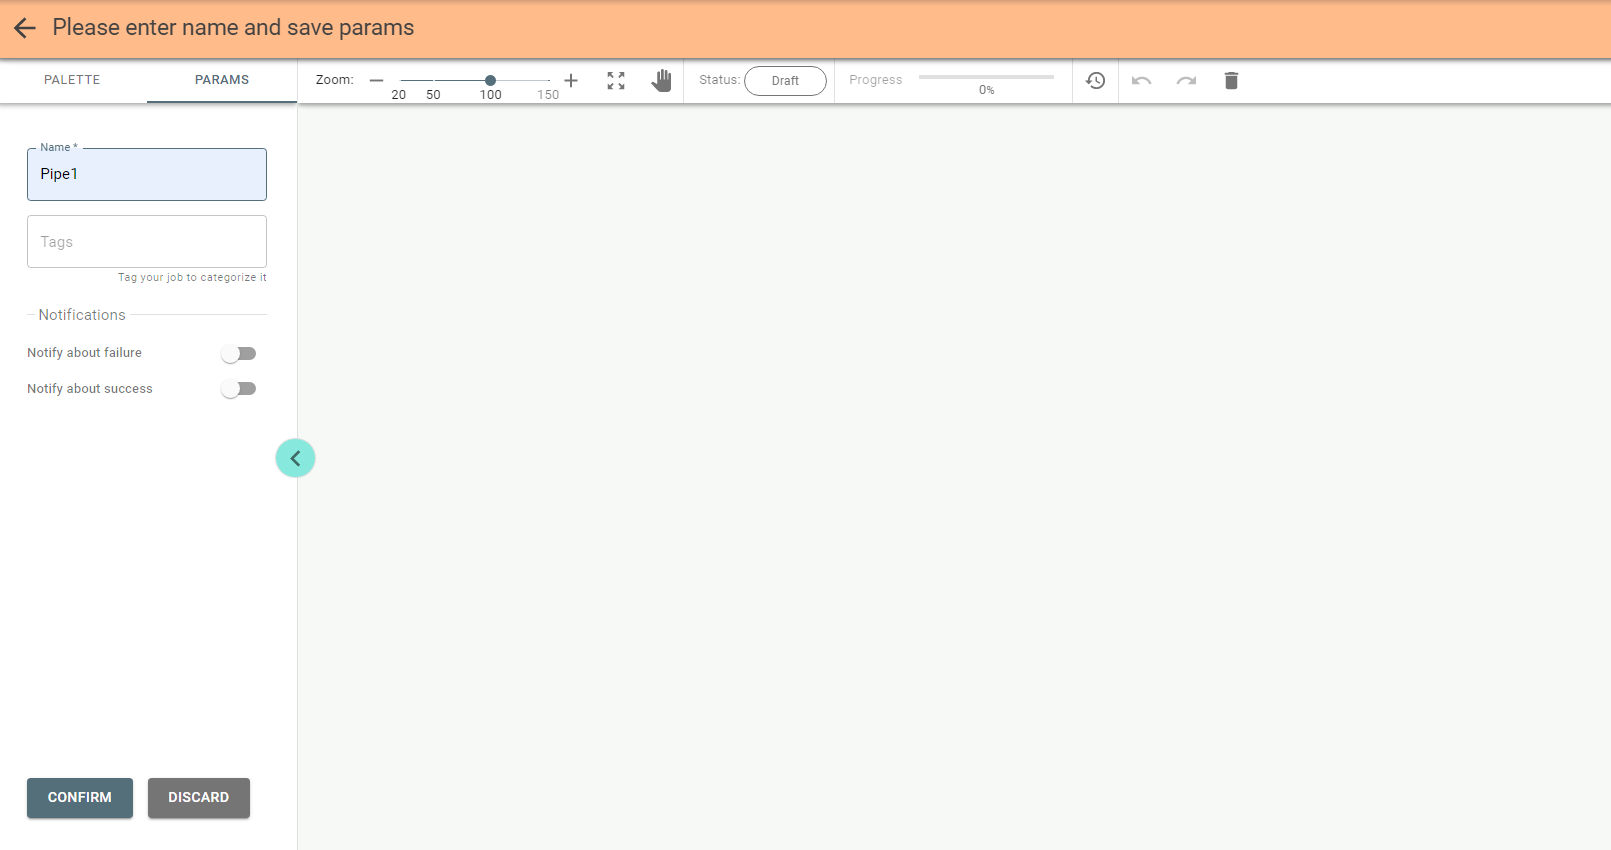
Set notifications to be notified on the pipeline events as you wish and push the Confirm button.
Save the pipeline by pressing the Save button on Pipeline Designer header.
Once a pipeline is saved the Palette tab with all available stages is opened by default:
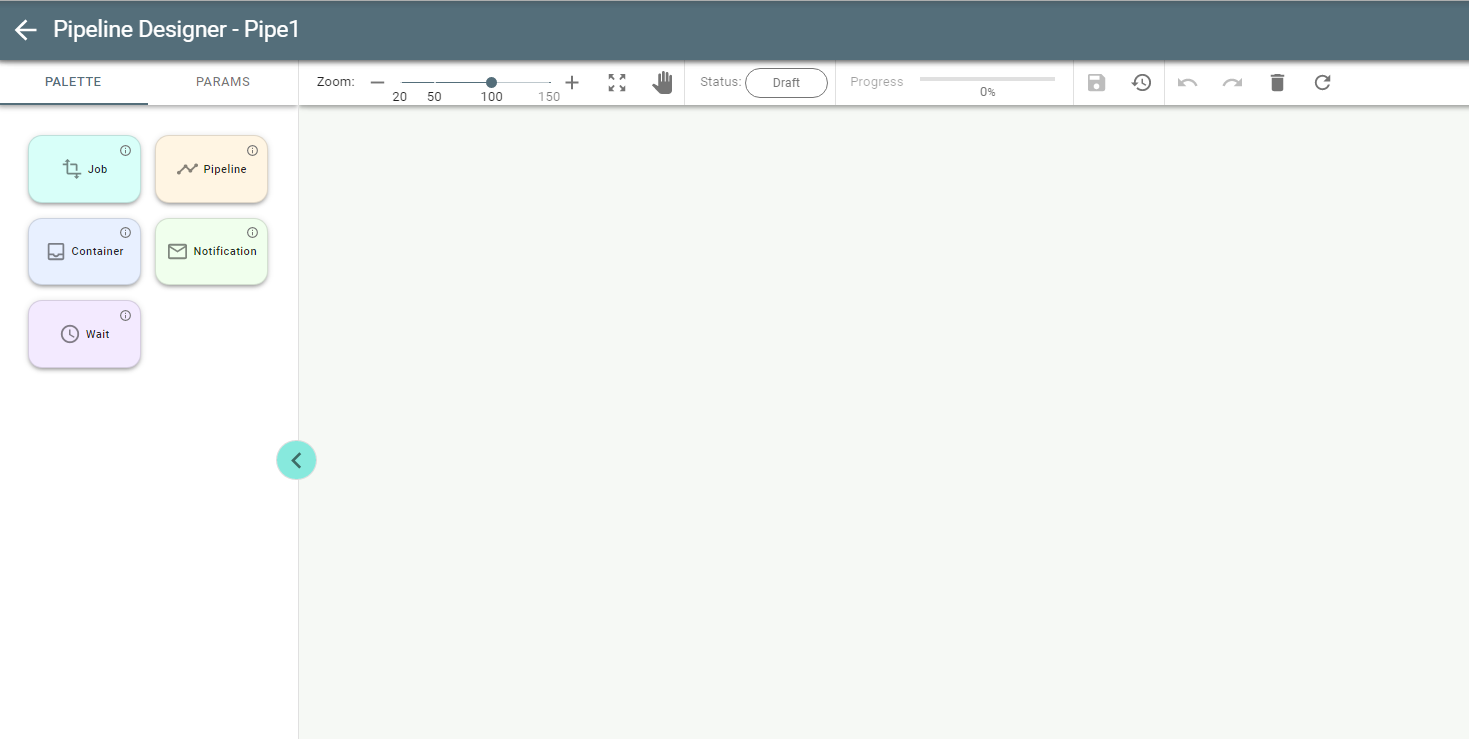
Pipeline is a combination of Job, Pipeline, Notification, Container and Wait stages.
The Notification stage is most often added to the configuration to notify about job/pipeline stage failure/success.
Drag the Job stage to the canvas:
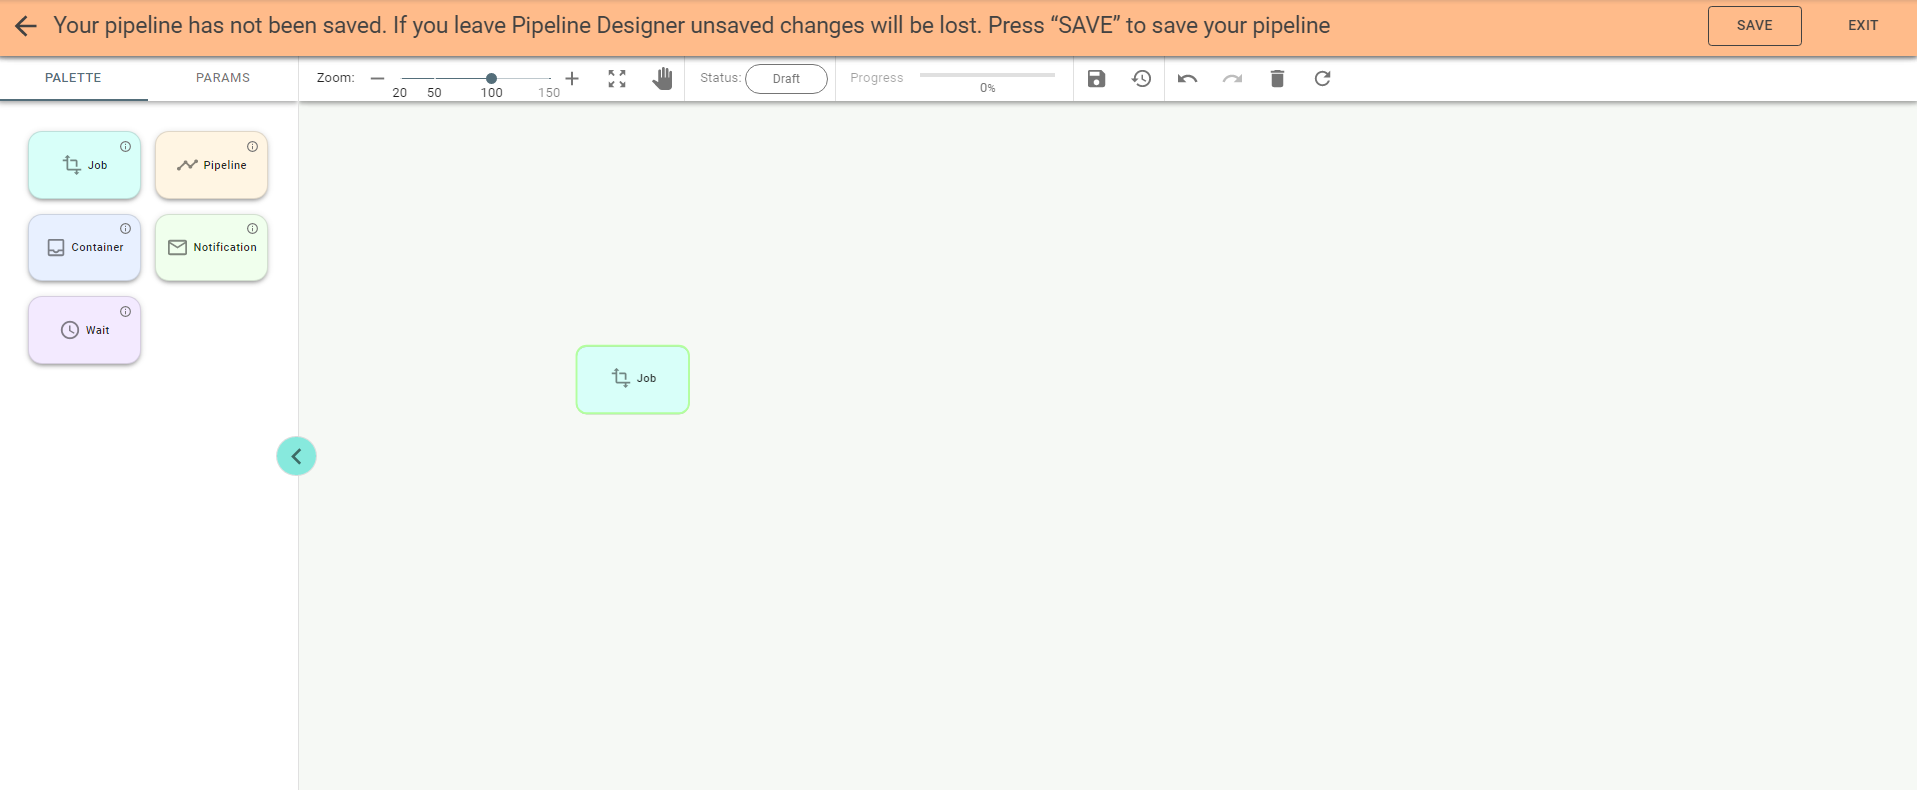
Double-click on the stage opens the configuration panel on the right:
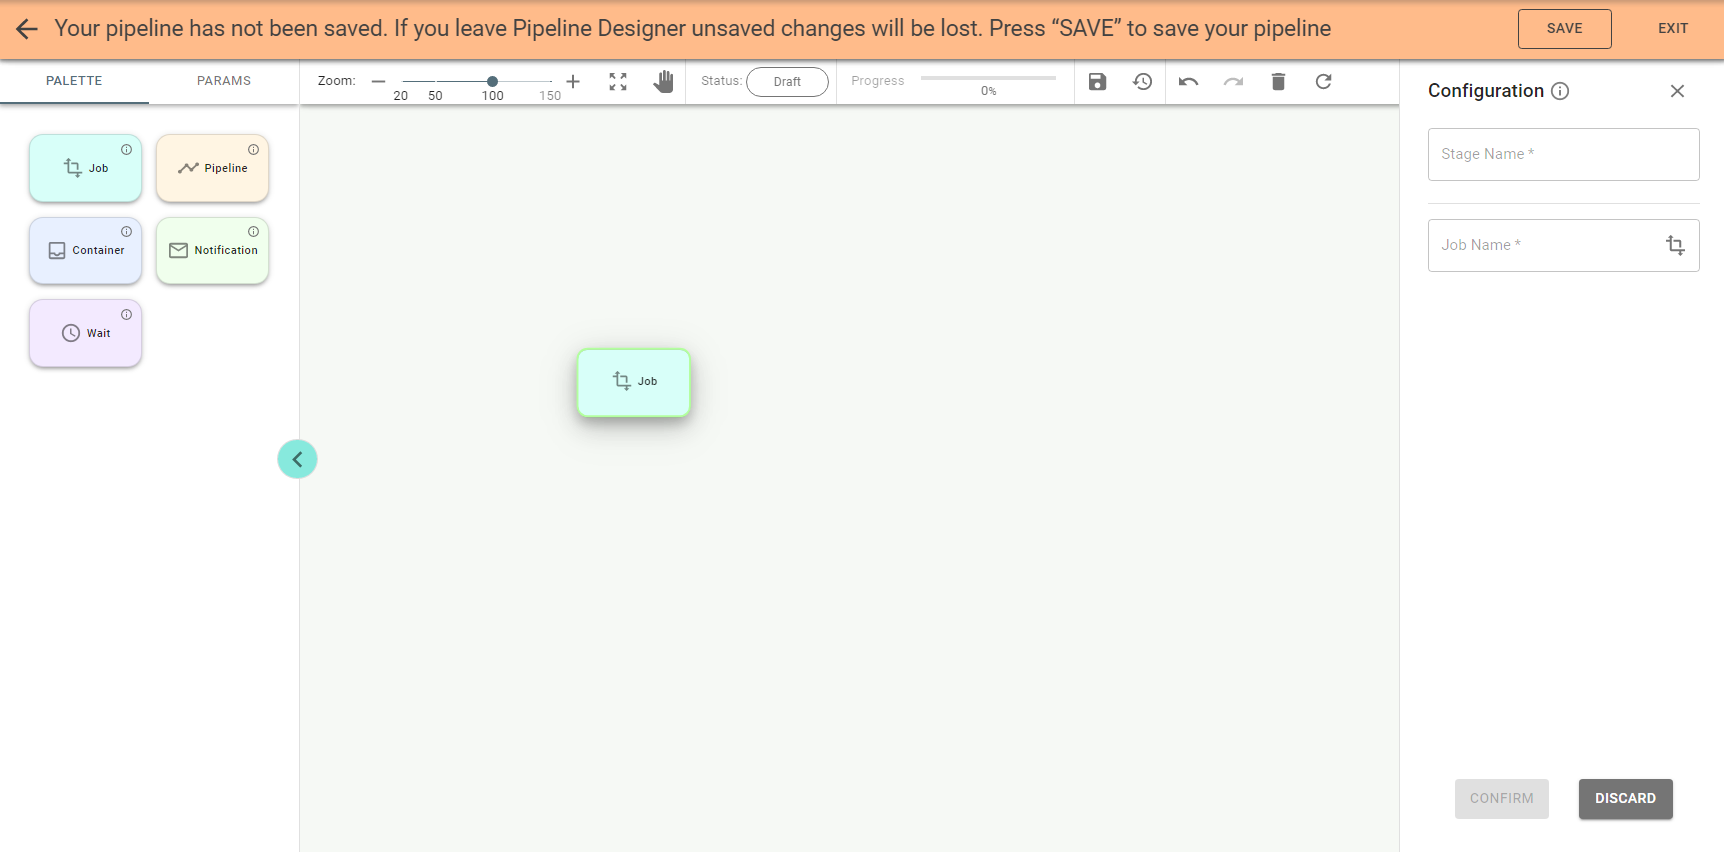
Enter the name for the stage and push ![]() to select a job.
to select a job.
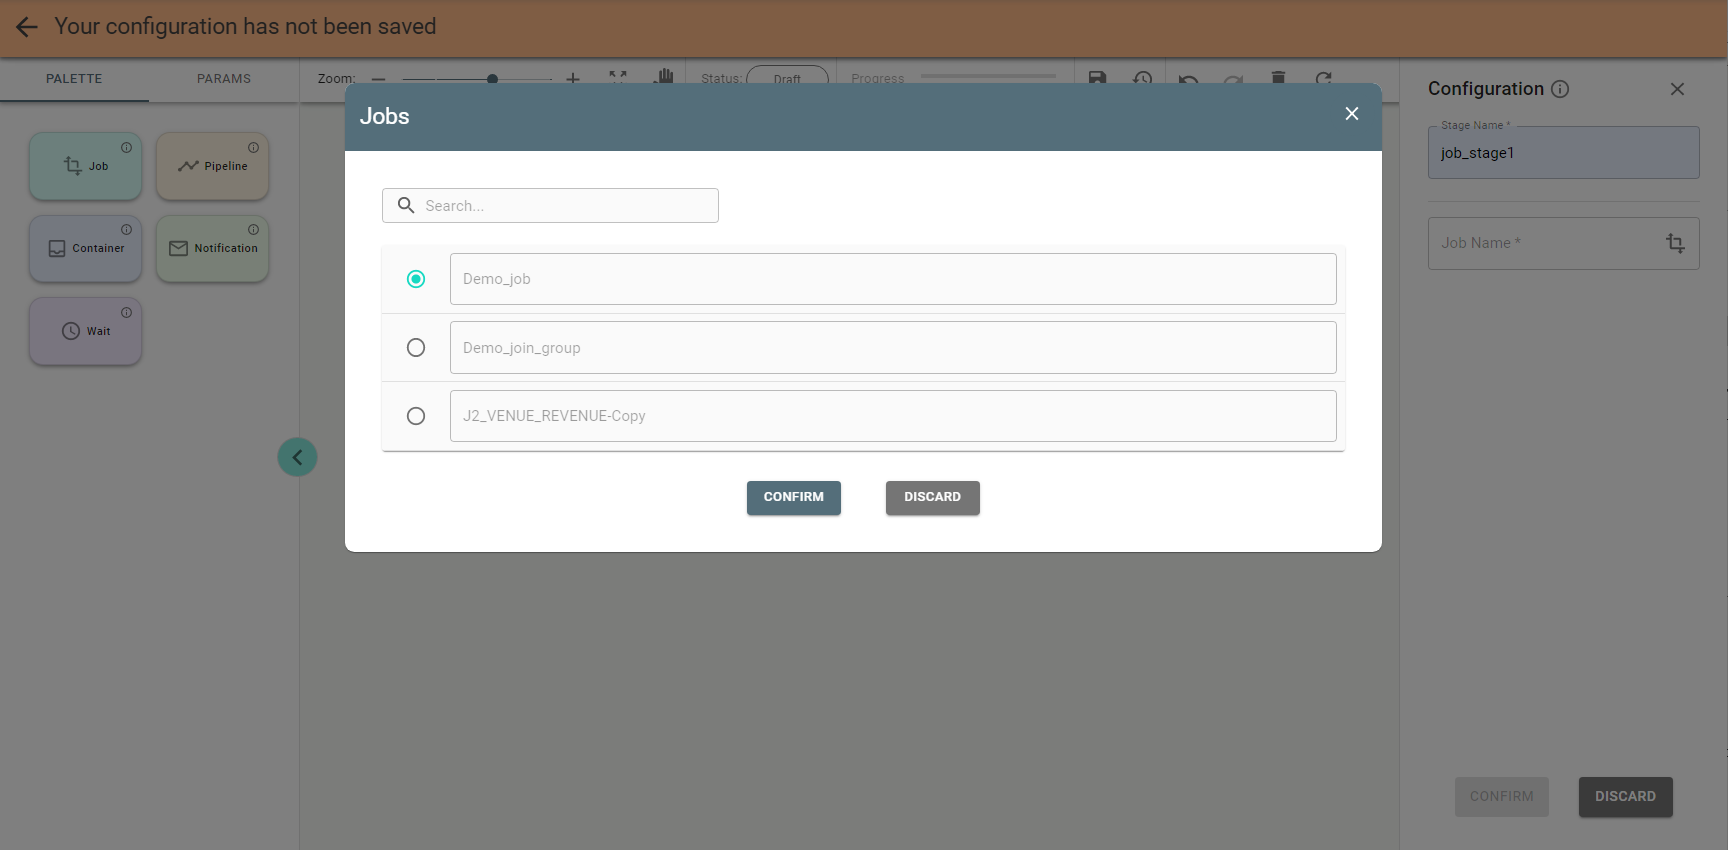
Pick the job and push the Confirm button.
Save the stage by pushing the Confirm button on the panel. Push the Save button on the header if you want to save the pipeline at this step.
Similarly to the Job stage the Pipeline stage can be used if you want to evoke existing pipeline within your pipeline.
Drag and configure other stages. Connect them in the same manner as in Job Designer.
Note: you can also add a stage by double clicking its tile on the palette.
You can link stages based on their success or failure. After connecting them to each other you can choose the Success or Failure link on the Job stage configuration panel. There can be only one connection for failure.
See the example of configured pipeline:
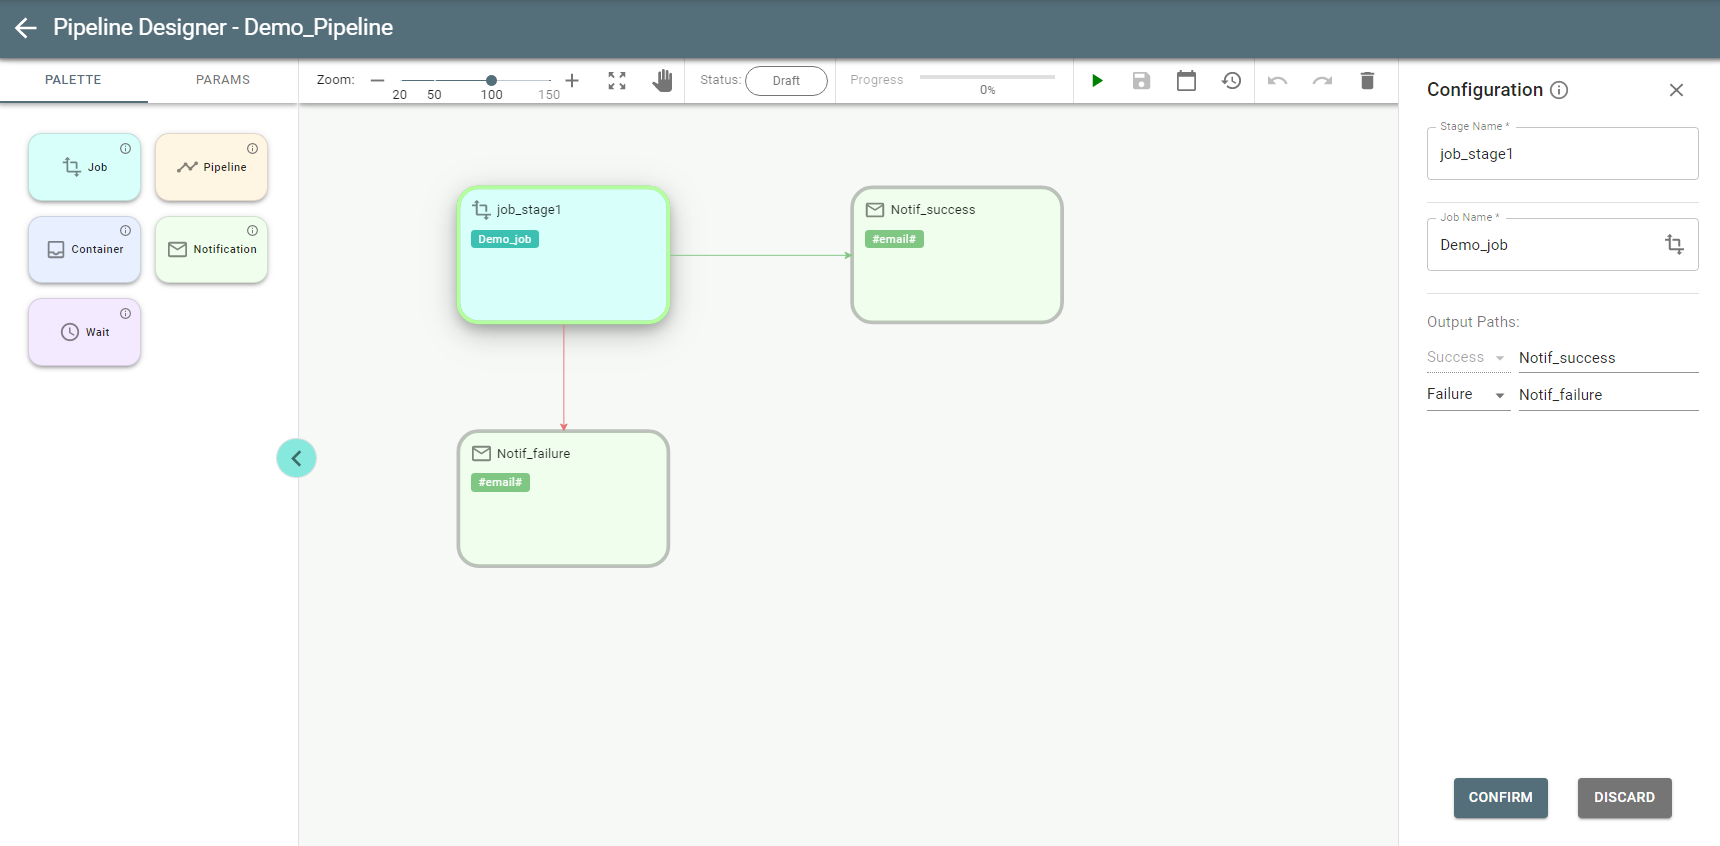
Before the first run or after updating, the status of the pipeline is Draft.
See each stage border painted in a Gray color, which stands for Draft.
The Container stage is used to run custom commands for executing any logic in a pipeline. You can use docker images instead of custom commands.
Start creating a pipeline by dragging the Container stage to the canvas and entering parameters in the
Configuration panel:
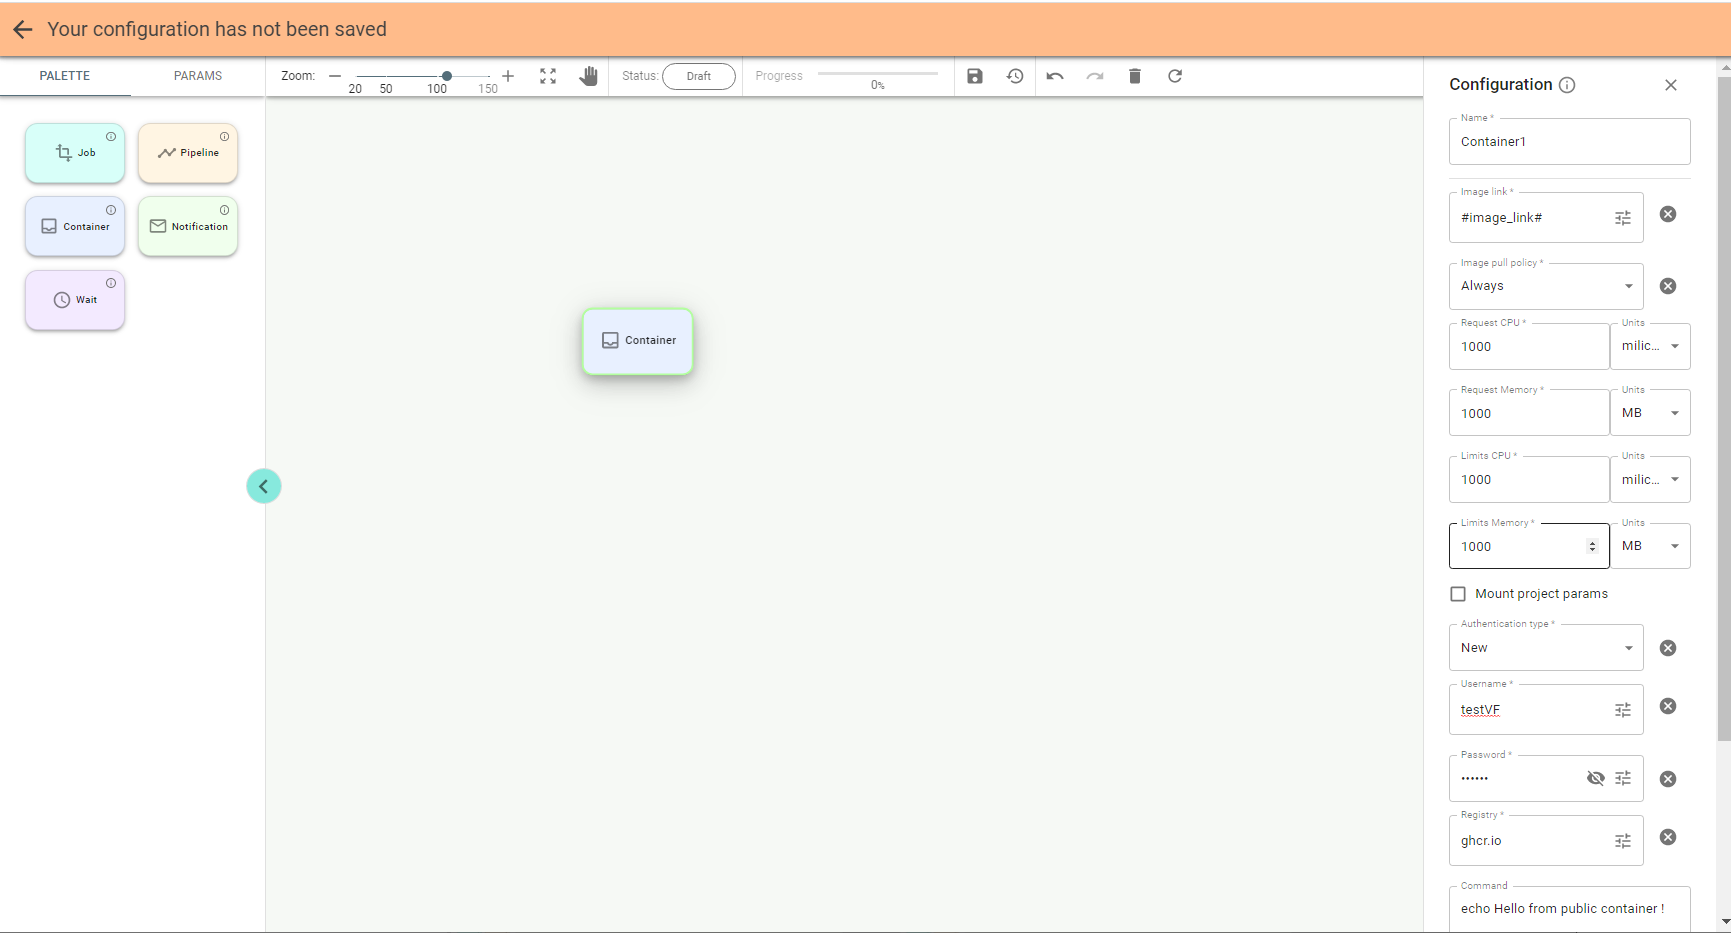
The Container stage has the following fields in the configuration:
✔ Image link. Docker image path. Examples:
✔ mysql, mysql:latest,
✔ bitnami/argo-cd:2.1.2, localhost:5000/bitnami/argo-cd:2.1.2, registry.redhat.io/rhel7:latest.
✔ Image pull policy. Defines when the image is pulled (downloaded). Possible values:
− If not present – is downloaded only if it does not exist locally;
− Always – is downloaded before each start;
− Never – is not downloaded, a local copy is used.
✔ Requests and Limits CPU
✔ Requests and Limits memory
✔ Mount project parameters. Defines whether to mount all project parameters as environment variables inside the Pod.
✔ Authentication type
✔ Authentication mode can be one of these:
− Not applicable: image pull secrets are not required as the image is pulled from the public registry;
− New: create a new image pull secret on the fly by providing all necessary information;
− Provided: use the existing image pull secret by providing its name (Image pull secret name).
✔ Image pull secret name. Name of the secret to pull the image. Note that it must exist within the same k8s namespace as the current pipeline.
✔ Username
✔ Password
✔ Registry. Name of the registry for authentication.
✔ Command. The command is to be executed once Pod is created.
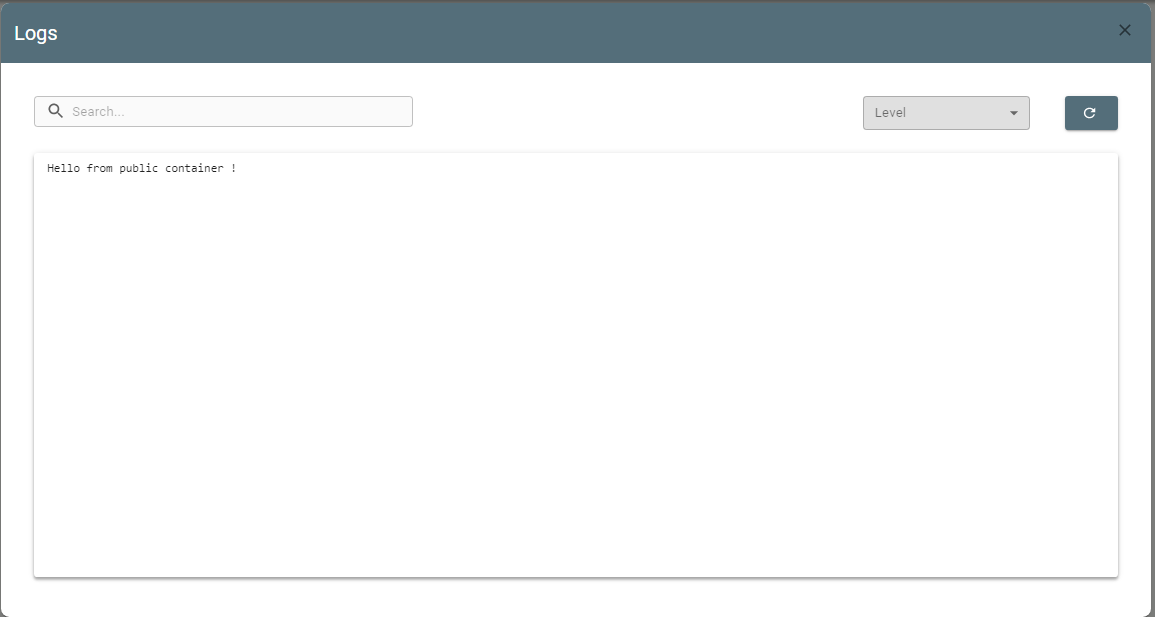
Important: The Container stage has a Logs button ![]() so you can see logs.
so you can see logs.
If the pipeline completed successfully, the logs display the message contained in the Command field in the configuration of the Container stage.
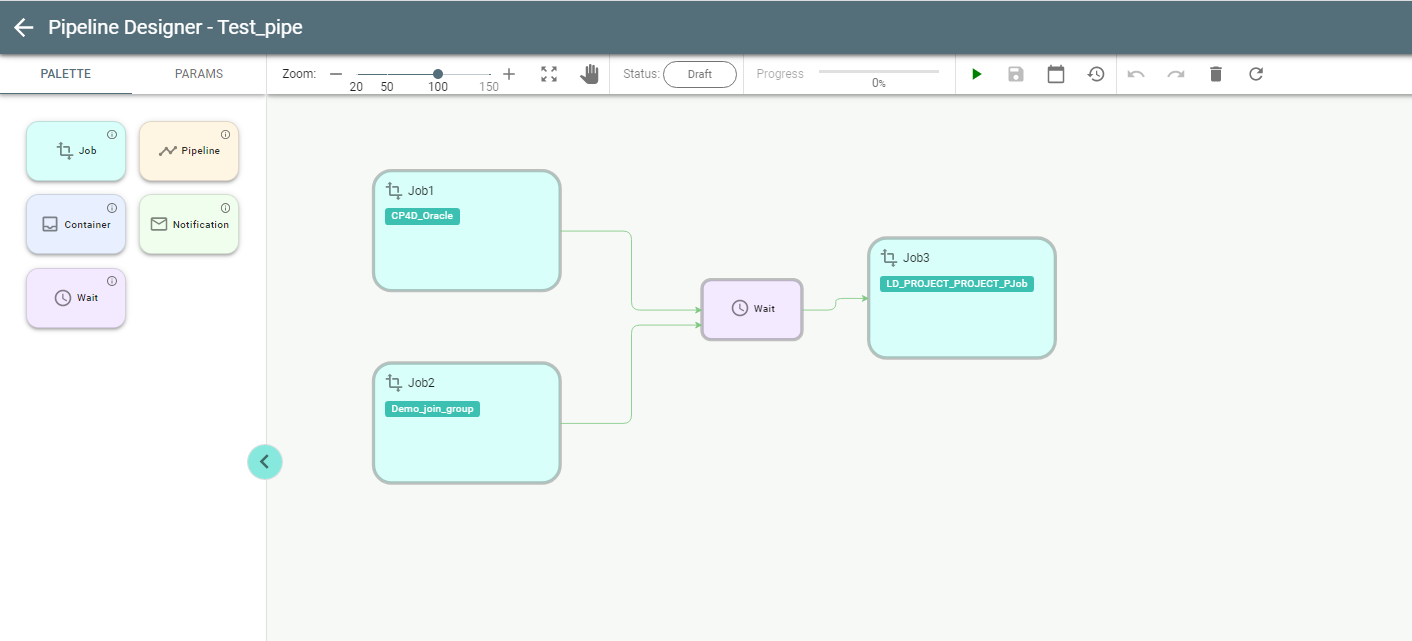
The Wait stage is a dummy stage with no configuration, used for running multiple jobs in parallel as in this example:
5.3. Pipeline Designer Functions Overview
The following functions are available in Pipeline Designer:
✔ Zoom functions:
![]()
✔ Move elements: ![]()
✔ Move elements/screen: ![]()
✔ Show pipeline status: ![]()
✔ Show pipeline progress: ![]()
✔ Run pipeline ![]() / Stop pipeline
/ Stop pipeline ![]() (for running)
(for running)
✔ Create cron schedule for pipeline ![]()
✔ Save pipeline ![]()
✔ Undo / Redo operation on canvas ![]()
✔ Remove element from canvas ![]()
✔ Refresh ![]()
5.4. Pipeline Execution
If you run a pipeline, as in the above example, its status changes from Draft to Pending and then to Running. Push Refresh to update the status.
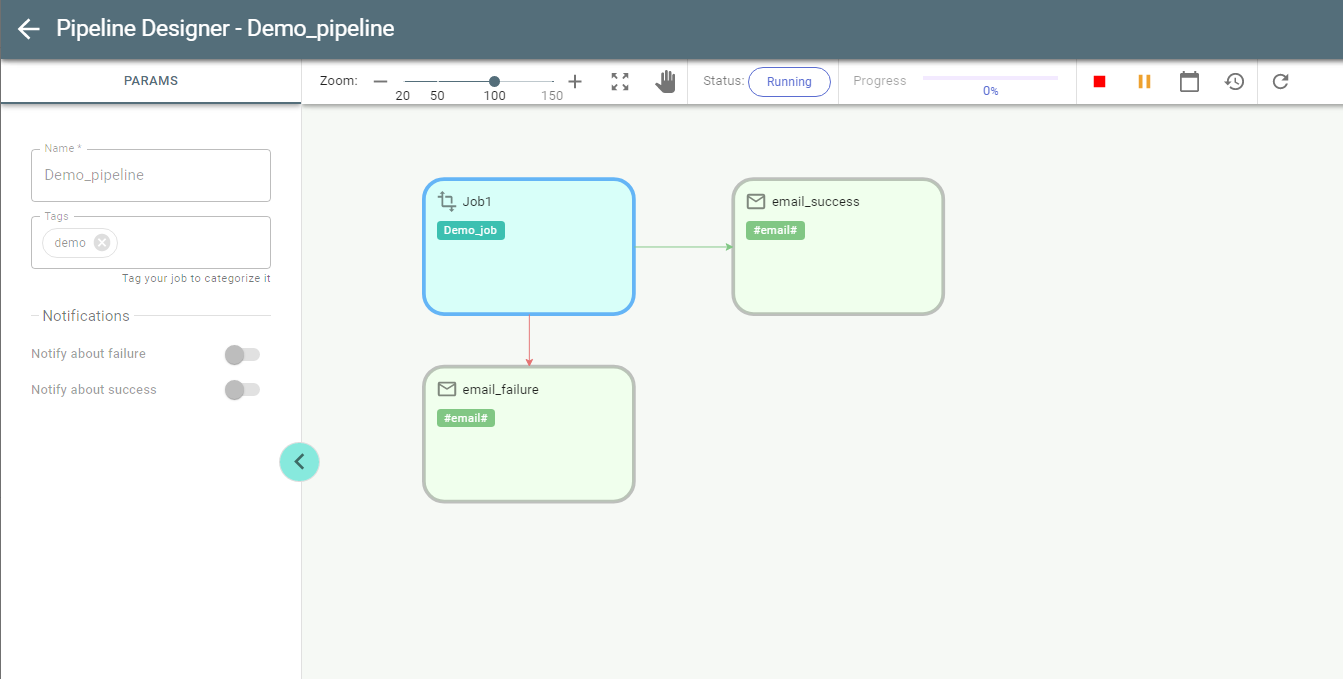
The border of the stage currently running is painted in Blue:
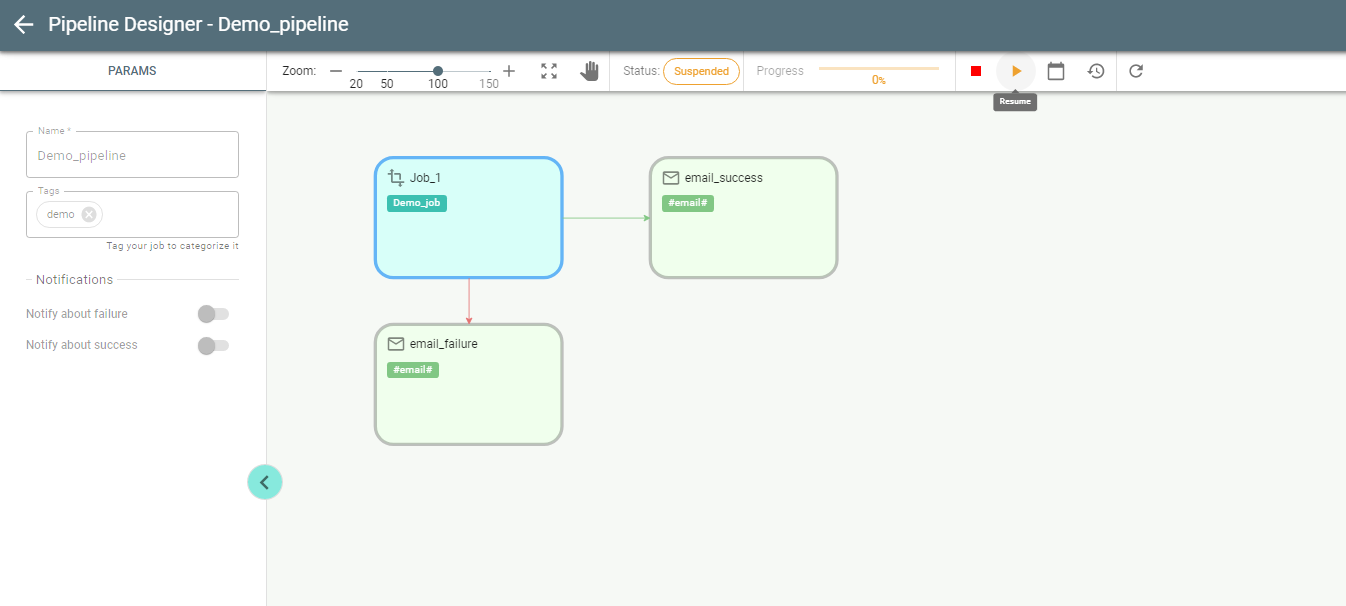
While running a pipeline can be stopped or suspended with Stop/Suspend buttons respectively: ![]()
Once suspended it can be resumed with Resume button:
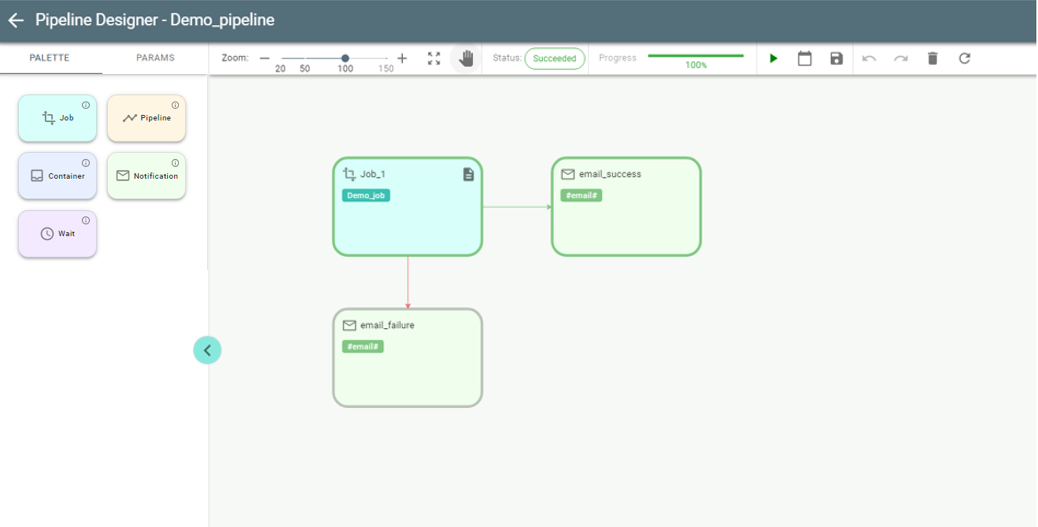
If a pipeline succeeds, all completed stages are painted in Green, indicating success.
The stages configured for failure scenario (red arrow) remain Gray as a Draft as they have not been executed.
If a pipeline fails, then the Red border indicates the failed stage:
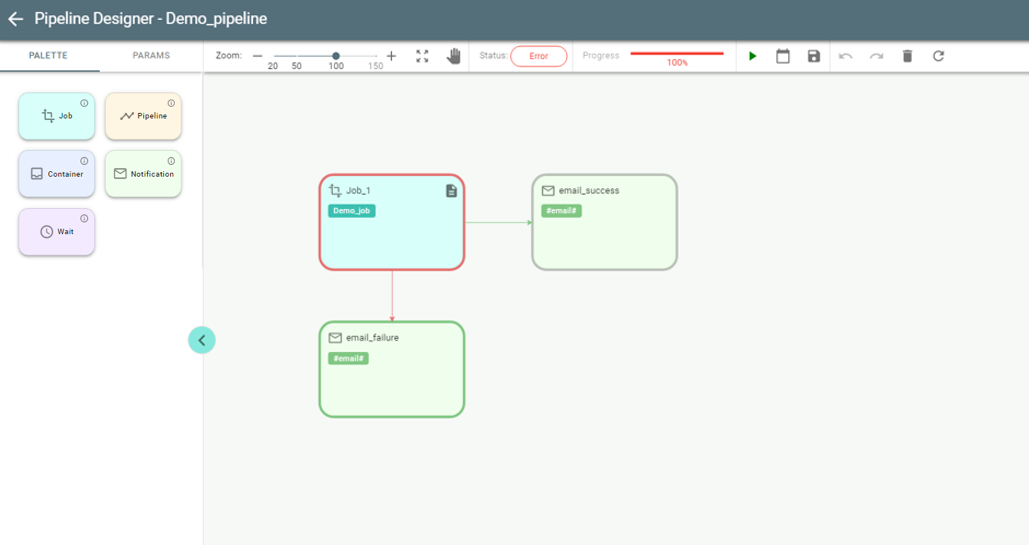
A failed pipeline can be re-run from the point of failure with button ![]() button either from Pipelines overview page or Pipeline Designer.
button either from Pipelines overview page or Pipeline Designer.
Important: Job stage has the Logs button ![]() for analyzing logs of a certain job.
for analyzing logs of a certain job.
Use the History button ![]() to view information about previous runs of the pipeline.
to view information about previous runs of the pipeline.
5.5. Scheduling a pipeline.
You can schedule a pipeline to run with the Scheduling button:
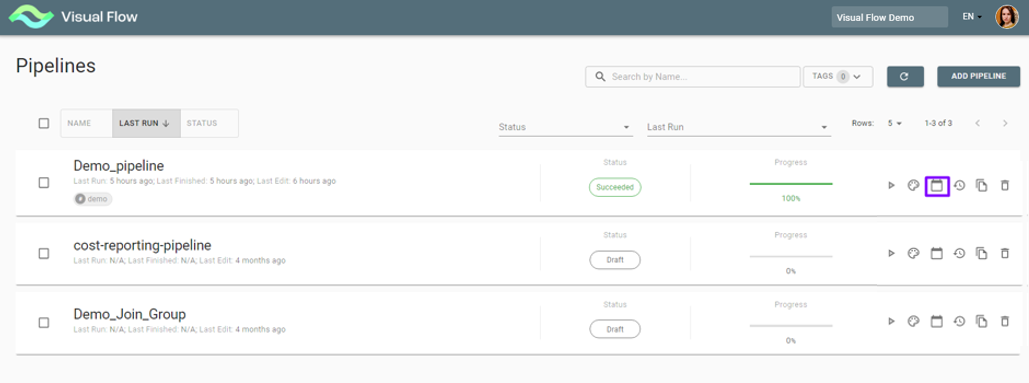
It opens the Scheduling window:
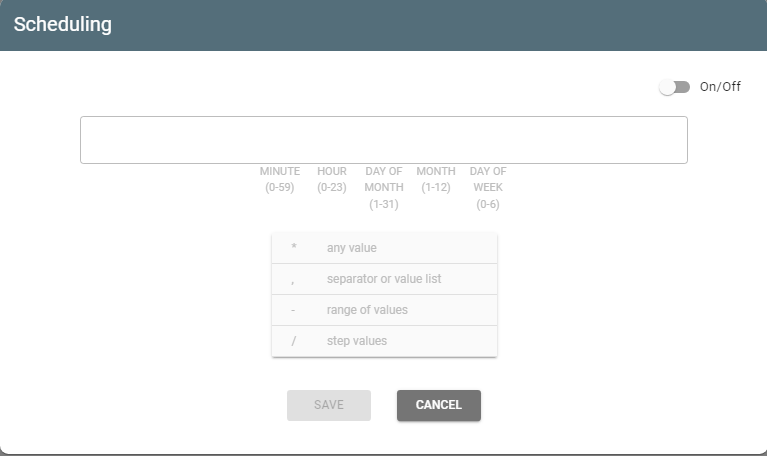
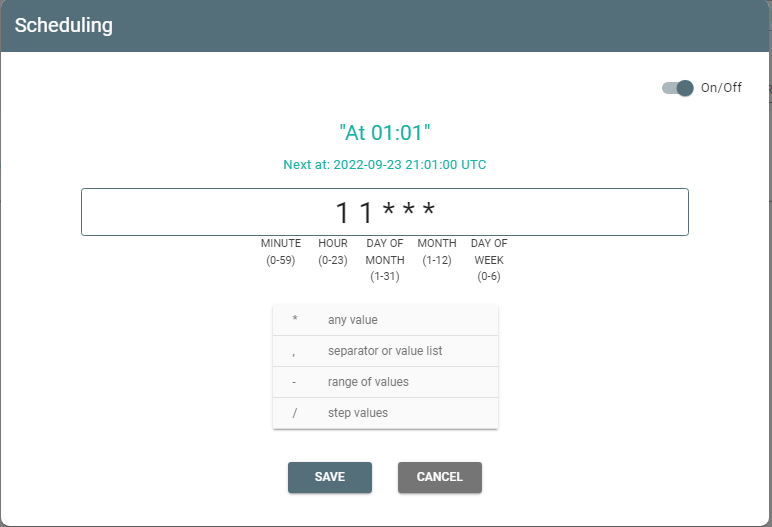
Switch the toggle on and enter values of minute/day/day of month/month/day of the week through spaces according to the tips:
